Adding New Insurance Plans
![]() Related Training
Related Training
Adding Insurance Payers and Plans Recorded Class
You add new insurance plans when you create a new policy in a Patient Record and, as an administrator, from the Administration tab.
Note: You must have medical insurance turned on to use it.
In a Patient Record
You can add an insurance plan when you create a new Patient Record and when you edit an existing Patient Record.
To add an insurance plan in a Patient Record:
-
For a new patient, in the Search Patients field, type the patient’s name to make sure he or she is not in the database and then click Create New Patient.
-
In the Patient Record, add information in the required fields, which are displayed in bold.
-
In the Jump To section, click Insurance Information, or use the scroll bar to find the Insurance Information section.
-
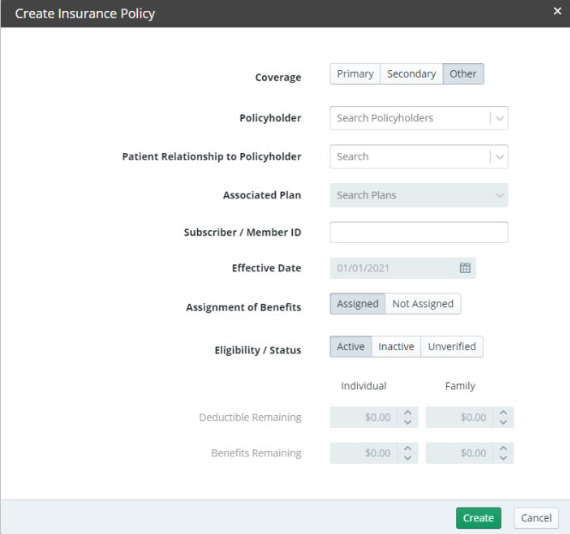
Click Add Insurance Policy. The Create Insurance Policy window is displayed.

-
In the Coverage field, select Primary, Secondary, or Other.
-
In the Policyholder field, select the policyholder to be associated with the policy.
-
In the Patient Relationship to Policyholder drop-down field, select one of the following:
-
Spouse
-
Child
-
Employee
-
Handicapped Dependent
-
Life Partner
-
Dependent
-
In the Associated Plan field, select the employer from the list.
-
In the Subscriber / Member ID, enter the identification number.
-
In the Effective Date, select a date from the calendar.
-
In the Assignment of Benefits field, click Assigned or Not Assigned.
-
In the Eligibility / Status field, click Active, Inactive, or Unverified.
-
In the Deductible Remaining, add the amount per individual.
-
Click Create.
-
Click Save Patient.
From the Administration Tab
To add an insurance plan from the Administration tab:
-
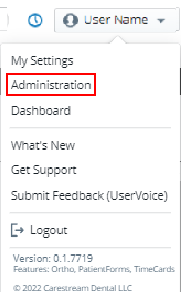
Click your user name in the upper-right corner of the window. A list is displayed.

-
Click Administration, if you have user permission.
-
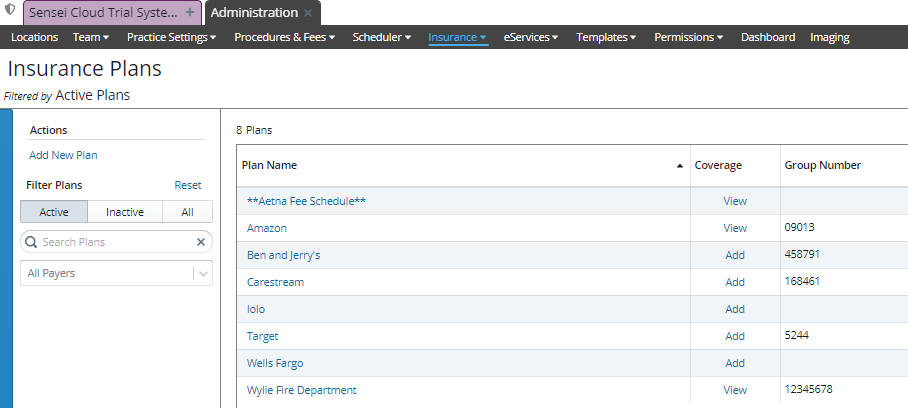
On the Administration tab, select Insurance > Plans. The Insurance Plans window is displayed.

-
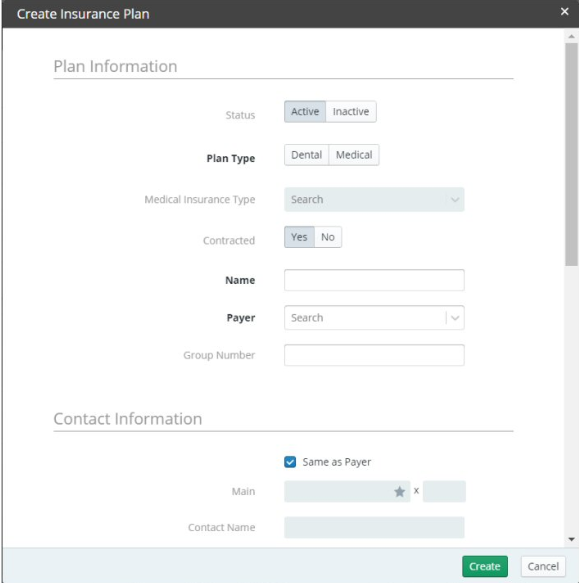
Under Actions, select Add New Plan. The Create Insurance Plan window is displayed.

-
In the Status field, verify that Active is selected.
-
In the Plan Type field, select Dental or Medical.
-
If Dental, an ADA Paper Claim Format option enables you to select the 2019 or 2024 ADA Form. While the 2019 ADA claim form is the default for current plans, new plans that are added default to the 2024 claim form.
-
If Medical, you are prompted to select the Medical Insurance Type.
-
In the Contracted field, click Yes or No.
-
In the Name field, type the employer name.
-
In the Payer field, select an insurance company.
-
In the Group Number field, enter the number, if you know it.
-
In the Contact Information section, select the Same as Payor option OR deselect the option and add the information in the fields.
-
Enter the Fee Coverage Information details for the plan.
-
Click Create.
Setting Coverage Details and Benefits by Category on an Insurance Plan
Importing Coverage Details to an Insurance Plan
Setting Up Insurance Claim Processing
Canceling and Resubmitting Insurance Claims
Submitting Secondary and Other Claims
Using ICD-10 Medical Diagnosis Codes and Submitting Medical Claims
Using CPT Codes for Medical Billing
Viewing Insurance Claims Statistics