Confirmation KPI Widget
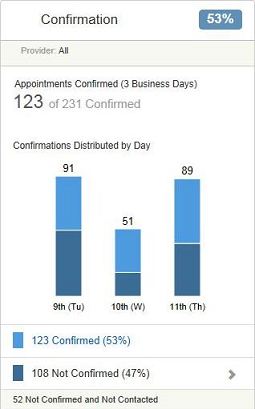
The Confirmation KPI widget in the Springboard window displays details of the appointments at the practice for the next three working days, along with the percentage of appointments that have been confirmed for that period.
Depending upon the Springboard settings that have been applied by the system administrator, the window displays details about the appointments for the practice or just for the logged-in user.
For each day, the total number of booked appointments is displayed in a bar chart. The light blue section of the bar represents the number of appointments that have been confirmed, and the dark blue section represents the number of appointments that have not been confirmed. Hover the mouse over the relevant colour section to display the number of confirmed or unconfirmed appointments for the day.
The total number of confirmed and unconfirmed appointments are displayed as a number and as a percentage at the bottom of the window. In addition, you can see the number of appointments that do not have a confirmation, as well as the number of patients who have not been contacted.
Patients can be contacted in different ways, such as SMS, email or phone. If you have enabled the option of SMS Responses Supported, patients can confirm their appointments by sending a text back, which automatically updates the confirmation status of the appointment.
To display a list of the appointments that have not yet been confirmed, click the bottom of the tile where it shows the number of not confirmed appointments, or click Confirmation on the top menu bar.

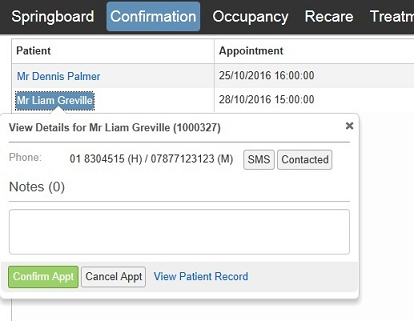
In this window, you can see which patients have been contacted and when they were contacted. You can also see contact numbers so that you can contact patients from here without having to open patient records or use the Day List.
By default, the list is displayed in appointment order, but you can change the order by clicking on the relevant column name (Patient, Appointment, and so on).
If you want to update the status of the appointment, click the patient’s name to display more details. Options on this window can be used to update the status of the appointment.
|
SMS |
If SMS is enabled for the patient, you can send an SMS message by clicking this button: otherwise, the button is disabled. If you do send an SMS from here, it uses the Immediate SMS Reminder template. This template can be found under Standard Letter templates in Doc Mgr and can be modified in the normal way, if required. If you modify this template, make sure that you use the correct merge field for the appointment time — [Patient -Appt Time (hh:mm)] — and appointment date — [Patient - Appt Date (dd/mm/yy)]. |
|
Contacted |
If contact is made by telephone, letter or email, you can click this button to update the status of the appointment with the date and time that the patient was contacted. |
|
Notes |
If you want to add any notes about the appointment, such as a phone message was left or that there was no answer, you can write them in this field. These notes are displayed only on this window; the notes are not added to the patient’s communication window or the appointment book. When the appointment is in the past, you cannot retrieve this information. |
|
Confirm Appt |
If a patient is contacted and they confirm the appointment, you can click this button to update the appointment book and the Springboard window. When completed, the patient’s name remains on the window in case you want to make more amendments. Refreshing the window removes any patients' names that have been confirmed. |
|
Cancel Appt |
If a patient is contacted and they want to cancel the appointment, you can click this button to be taken to the appointment book for that day. From there the appointment can be cancelled and a new one booked, if necessary. Important: When you click this button, you do not cancel the appointment. |
|
View Patient Record |
If you click on this link, the Springboard window is closed, and you are taken to the patient’s record. |
Click the X in the upper-right corner to return to the list of appointments. You can then click on one of the options across the top menu bar to access another KPI, or click on X in the upper-right corner to return to the Main menu.
You can see which appointments have been confirmed when you look at the Planner.
A green box indicates that the appointment has been confirmed. A red box indicates that the appointment is unconfirmed. A mobile phone icon indicates that an SMS has been sent, but the appointment has not yet been confirmed. An envelope icon indicates that an email has been sent, but the appointment has not yet been confirmed. Hover the mouse over the box or icon to display details about when SMS messages or emails were sent.
To confirm appointments from within the Planner, right-click the appointment and select Confirmed from the list. To confirm appointments in the Appointment Details window, select the Appointment Confirmed option.
Treatment Plan & Pipeline KPI Widget
Daily Revenue by Provider KPI Widget