Managing Appointments
The Scheduler enables you to perform appointment-related tasks from where you are working in the software. There are several different ways to begin making an appointment.
New Appointments
You can begin making an appointment from these locations:
-
 Click the New Appointment button on the main toolbar. A new blank appointment card is displayed.
 -
Use the patient search field to select a patient, and then drag the patient to the day view. The patient tile hovers there while you select a time. Click the plus sign on the time slot, and the appointment card is displayed with the patient's information.
-
Use your cursor to select a time slot on the day view, click the plus sign to open a new blank appointment card, and select the patient from the appointment card's search field.
-
Select a patient from the Pending List or the Short Call List and click Rebook. The appointment appears in reschedule mode hovering over the day view.
Appointment Tiles
Appointments appear on the day view as tiles. An appointment tile is your first interface for an appointment.
-
Hover your mouse over a tile to expand it briefly to display times and information.
-
Click a tile once to display a flyout -- a small panel with more information and options. The flyout displays the patient's contact information, with the preferred method highlighted.
-
Click a tile twice to open the appointment card.
The color and amount of information displayed on the tiles depends on the current privacy setting, the number and width of the columns, how many appointments are booked into the same time slot for a column, the status of the patient, and the overlay, if any, you have selected for viewing.
For example, a patient's preferred phone number is displayed on the tile when a phone number has been selected in the patient record as the preferred contact and Preferred Phone is selected in the Overlay Designer.
-
If email is the preferred contact type, it displays on the flyout, but not on the appointment tile. The appointment tile displays the phone number that was previously designated as the preferred contact. If no phone number is designated as preferred, the tile displays the cell number, home number, or work number, as available.
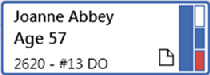
Appointment tiles can also display mini icons to alert you to the following information:
![]()
-
Medical alert
-
New patient
-
Note attached
-
Lab case pending
-
Group appointment
-
Confirmed
-
The colored blocks on the right edge of the tile represent time units for the appointment as it relates to the provider time. White = unbooked; Color = booked; Red = Overbooked. For more information, see Scheduling Doctor / Assistant Time.
 Production Goals
When the Production Goal overlay is turned on, you can hold your mouse over the square dot on a provider's column to see a summary of that provider's net production toward assigned production goals. This feature can be useful when deciding which provider to book for a particular time slot.
Daily production summaries can be viewed by placing the cursor over the production goal square in the current date field.
Checking the Patient In and Out
Scheduling Doctor / Assistant Time