Setting Up Locations
To set up locations:
-
In the Patient Flow Options window, click the Locations tab.
-
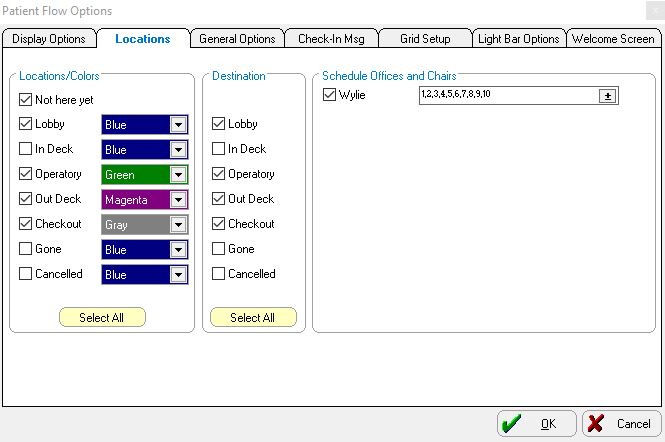
In the Locations/Colors section:
-
Select each of the Locations options to set up the locations in your office where patients will be waiting, receiving treatment, checking out, and so on. Click Select All to select all location options, or click Unselect All to deselect all location options.
-
For a patient check-in terminal, Not here yet is the only option that should be checked.
-
To assign a color to each location, click the drop-down arrow on the Color List field next to each location. Patient names that are moved to that location are displayed in that location's color. For consistency, all workstations should use the same colors to represent the same locations.
-
In the Destination section:
-
Select each of the Destination options to set up the locations to which a patient can be moved from this computer. Click Select All to select all destination options, or click Unselect All to deselect all destination options.
-
For a patient check-in terminal, Lobby is the default and cannot be changed. When a patient checks in, he is always moved to the lobby.
-
In the Schedule Offices and Chairs section:
-
Select the checkbox next to each office (schedule book) from which you want to search for Patient Flow data; for example, if you have only one schedule book, select Office 1. If you have multiple schedule books, but only want to see some of them, select the ones you want to view.
-
If your practice has more than 10 schedule offices, use the scroll bar on the right side of the window to view the additional offices.
-
To select specific chairs, click the button next to the office to display the Select Chairs window. The system default is 10 chairs. Click the options to select additional chairs, or deselect an option to hide the chair from view. Click OK.
Note: If you use the treatment card, this option controls the number of chairs you select. It also interacts with the Light Bar/Call Doctor feature. Do not display more schedule offices and chairs than what your Schedule Maintenance parameters require.
