Setting Up Check In Messages
You can configure the software to automatically add a check-in message for patients with a balance or a promise due, or for patients who are scheduled for a specific procedure. You can also manually set up a check-in message.
You can add an alert to a patient chart that prevents the patient from checking in. When the patient attempts to check in, the software displays a message, directing him to see the receptionist. As the receptionist checks the patient in, the Change Patient's Location window is displayed, and she or he can see the reason for the alert—a past-due balance, forms that need to be completed, and so on—and can speak to the patient about the matter.
An @ before the patient name in the Staff-Text-Based Patient Flow window or the Staff-Photographic Patient Flow window indicates that a check-in message exists for the patient.
To automatically add a check-in message:
-
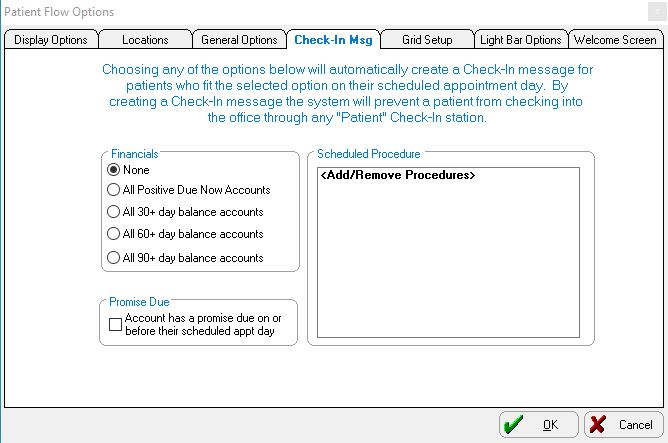
In the Patient Flow Options window, click the Check-In Msg tab.
-
In the Financials section, select an option. Selecting a financial option adds a Patient has a balance due message to the patient chart. Only staff members can view this message.
A patient with a check-in message is told to check in with the receptionist. The patient does not see the reason for the message.
-
In the Promise Due section, click the Account has a promise due on or before their scheduled appt day option. Selecting this option adds a Patient has a promise due message to the patient chart. Only staff members can view this message.
A patient with a check-in message is told to check in with the receptionist. The patient does not see the reason for the message.
-
In the Scheduled Procedure section, click Add/Remove Procedures. The Select Check-In Message Procedures window is displayed.
-
In the Available Procedures section, double-click a procedure to move it to the Selected Procedures section. Selecting a procedure option adds a Patient is scheduled for <selected procedure> message to the patient chart.
-
Click Apply.
-
Click OK.
Note: Automatic check-in messages continue to be displayed as long as the patient qualifies for any of the automatic check-in message criteria.
