Click the Maintenance/Set-up
 button and select Carrier
Maintenance. The OrthoTrac
Carrier Lookup window is displayed.
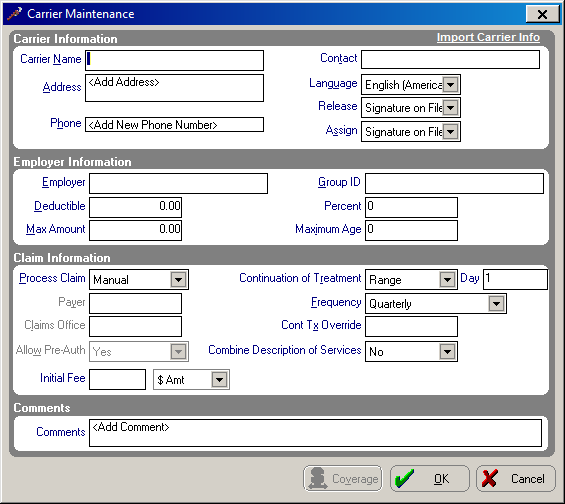
Click Add New. The Carrier Maintenance window is displayed.
As you add new patients, you add insurance carriers and employers. Use the carrier maintenance function to add, update, and delete carriers.
To add a carrier:
Click the Maintenance/Set-up
 button and select Carrier
Maintenance. The OrthoTrac
Carrier Lookup window is displayed.
Click Add New. The Carrier Maintenance window is displayed.

The Carrier Maintenance window has four sections:
Carrier Information
Employer Information
Claim Information
Comments
To add carrier information:
Type the carrier’s information in the appropriate fields. If the carrier already exists, click Import Carrier Info to import the name, address, and phone number.
Select an option in the Release field.
Select an option in the Assign field to specify the assignment of benefits.
To add employer information:
Press Tab or click in the Employer field. Press Enter or double-click in the field to display the OrthoTrac Employer Lookup window.
Type the employer name and press Enter. If the employer is already in the list, the name is selected. Click OK to attach the employer to the carrier.
Click Change to edit the data for an employer. If the employer is not in the list, click Add New.
In the Deductible field, type the amount the patient must pay.
In the Max Amount field, type the dollar amount of the patient’s maximum benefit (yearly or lifetime) minus the deductible.
In the Group ID field, type the unique identification number for the insurance carrier/employer.
In the Percent field, type the percentage that the carrier pays.
In the Maximum Age field, type the maximum age of a patient for whom the insurance provides orthodontic benefits.
To add claim information:
Press Tab or use the mouse to position the cursor in the Process Claim field and select Manual or Electronic.
In the Payer field, type the five-digit ID number found in the Payer List. The Payer field is inactive if you are submitting claim forms manually to the carrier.
In the Claims Office field, type NOCD, unless different in the Payer List. The Claims Office field is inactive if you are submitting claim forms manually to the carrier.
In the Allow Pre-Auth field, select Yes or No.
In the Continuation of Treatment field, select an option from the drop-down list. The default is Range, but you can select from the following options:
In the Frequency field, select an option from the drop-down list. The Frequency field indicates how often an insurance carrier requires a continuation of treatment claim to be filed.
In the Cont Tx Override field, type the continuation of treatment code for carriers that require a different code from the ADA continuation of treatment code; otherwise, leave this field blank.
In the Combine Description of Services field, select Yes to combine monthly amounts within a billing period into one date of service entry or No to itemize each month within the billing period.
To add additional reference information about a carrier, use the Comments field.
Click OK.
Setting Up the Financial Estimator