
Using the Clinical Imaging Tab
You can view, annotate, and edit on the Clinical Imaging tab. You can also use Organization Mode.
You can view images in different formats.
To view images:
Click the Clinical Imaging tab.
On the Clinical Imaging toolbar, click the Layout Mode button.
On the Image Layout toolbar, select the view you want—for example, Layout View 1 by 1 or Layout View 4 by 3.
If it is not already selected, click the Clinical Images tab near the bottom of the window. Thumbnails of the images are displayed. Use the scroll bar, if necessary, to see additional images.
Select the image you want, and drag it to the main window of the Clinical Imaging tab.
To annotate an image from the Clinical Imaging tab:
Click the Annotation Mode button on the Clinical Imaging toolbar. The Image Annotate toolbar is displayed.
Select an image from the Clinical Images tab near the bottom of the window. When an image is selected, the blue box around it turns green. To deselect an image, click it again, and the box turns from green to blue.
Drag the image to the main window of the Clinical Imaging tab. The image is displayed.
On the Image Annotate toolbar, select Annotation Text Tools. If the image was taken with dental imaging software, it opens in the software and can be annotated.
To edit annotations on an image:
Click the Edit Mode button on the Clinical Imaging toolbar. The Image Editor toolbar is displayed.
Select an image from the Clinical Images tab.
Drag the image to the main window of the Clinical Imaging tab. The image is displayed.
On the Image Annotate toolbar, select Edit Mode.
When the Clinical Imaging tab is displayed in organization mode, you can associate images with a single tooth, a mouth region, or a patient portrait.
To associate an image:
Click the Organization Mode button on the Clinical Imaging tab. The Organization Mode window is displayed.
Select from these options:
To associate an image with a specific tooth, drag the image from the Clinical Images tab to the tooth. A yellow dot is displayed on the tooth to indicate that an image is associated with it.
To associate an image with a specific region of the mouth, drag the image from the Clinical Images tab to the text that identifies the region. A yellow dot is displayed next to the region name to indicate that an image is associated with it.
To use an image as a patient portrait, drag the image from the Clinical Images tab at the bottom of the chart to the Portrait icon on the Organization Mode tab.
You can use these icons in the lower-right of the Organization Mode window:


These filters are displayed in the lower-right corner of all tabs:
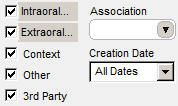
To reduce the number of thumbnails displayed, select only the type of image you want.
Accessing the Clinical Imaging Tab
Using the Clinical Imaging Toolbars