Daybook
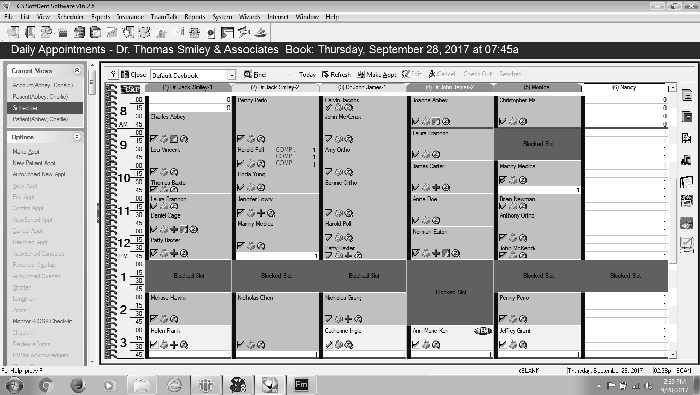
When the Scheduler is opened, one of four views is displayed, typically the default daybook. The daybook view is used to monitor patient appointments.

Each column in the daybook represents one room or operatory. The scroll bar at the bottom of the window is used to move left and right to display more rooms. The scroll bar to the right is used to move to earlier or later times of the day.
At the top of the window is the header bar. The header bar indicates the current view and the book and the day that are displayed.
Reading an Appointment
The patient’s name is displayed unless HIPAA security is on, and then only the initials are displayed. The numbers in columns at the right edge of the appointment identify the providers for the appointment. Procedure codes are displayed under the name.
A small red triangle in the upper-right corner of the appointment indicates an appointment note. Hold the cursor over it, and the note is displayed.
In addition, these icons are displayed along the bottom of the appointment:
![]() View Medical AlertView Medical Alert
View Medical AlertView Medical Alert
![]() Dial Patient for Short CallDial Patient for Short Call
Dial Patient for Short CallDial Patient for Short Call
![]() View Patient PortraitView Patient Portrait
View Patient PortraitView Patient Portrait
![]() Telephone NumbersTelephone Numbers
Telephone NumbersTelephone Numbers
![]() Lab Case OutstandingLab Case Outstanding
Lab Case OutstandingLab Case Outstanding
![]() Lab Case ReturnedLab Case Returned
Lab Case ReturnedLab Case Returned
![]() Hidden Slot NoteHidden Slot Note
Hidden Slot NoteHidden Slot Note
Appointments are displayed in the following default colors:
-
Yellow—Appointment is scheduled.
-
Blue—Patient has checked in.
-
Pink—Appointment is confirmed.
-
Green—Patient is in the operatory.
-
Gray—Patient is late.
-
Red—Charges have been posted.
-
Orange—Appointment is canceled or overlapped.