Setting Up Orthodontic Contracts
Creating Ortho Contracts
To create an Ortho contract:
-
On the Patient tab, select Financials > Contracts.
-
Under Actions, select New Contract. The Contracts window is displayed, with defaults entered for the Location and Provider in the Contract Summary section.

-
Enter a description for the contract, such as Phase I, Phase II, or Full Treatment. This value is reflected in contract-based ledger transactions.
-
In the Treatment field, select from the list to more specifically identify the course of treatment covered by the contract—such as Full Tx Braces, Invisalign, and so forth—or start typing in the field. If the option you want is not in the list, you are prompted to create it.
-
In the Treatment Modality field, select Mechanics or Aligners.
-
In the Bonding/Tx Start Date field, enter the date of service on which the planned treatment is scheduled to begin or the current treatment began.
Note: If the date is more than six months past, you are prompted to confirm, as this may affect insurance billing. You can plan future treatment in a pending contract state, but when activating, the date must not be in the future.
-
Enter the Est. Months of Tx. The Est. Completion Date is calculated automatically.
-
In the CDT for Initial Billing field, select the appropriate CDT code. In the Addl. CDT for Initial Claim field, select any additional initial CDT codes. All codes are posted to the Patient Ledger upon contract activation and included on the initial service claim.
Note: Ortho-specific CDT codes—D8000 series—are displayed by default, but any CDT codes can be entered by searching and selecting.
-
Enter the Contract Fee and any Discount Amount and Type, if applicable. The Contract Total is calculated automatically.
-
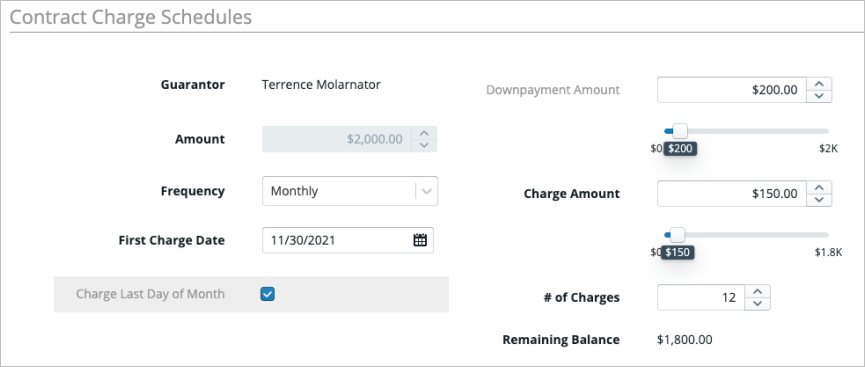
Scroll to the Contract Charge Schedules section. The Guarantor is entered automatically from the patient record.
-
In the Downpayment Amount, Charge Amount, and # of Charges fields, enter how and when the contract will be paid by the guarantor. These fields work together; changing any one adjusts the other two. Use the sliders to find the best combination to suit the office and the patient.
-
Select the Frequency for which the specified charges will be posted.
If you select Pay in Full in the Frequency field, the guarantor's full contract amount is recognized as a down payment when the contract is activated. This prevents future, scheduled contract charges from being posted to the Ledger, but allows for insurance-based charges to be posted on their scheduled dates.
Active contracts cannot be marked Paid in Full, but you can pre-pay the guarantor’s portion of the contract balance to realize some or all of the guarantor’s remaining balance as current.
-
Enter the First Charge Date for which charges will be levied for this charge schedule.
Note: The Charge Last Day of Month option becomes active when the last day of the selected month is entered in this field.
-
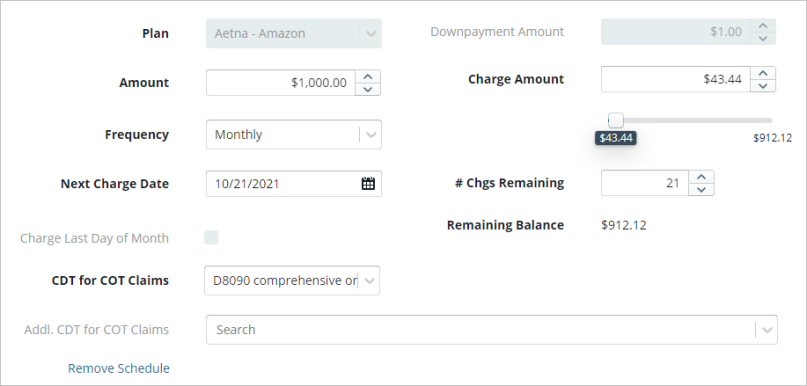
If the guarantor has insurance on record, the Add Charge Schedule link is displayed. Click this link to display another set of entry fields to enter the insurance plan's charge schedule.
-
Select the patient's Plan and specify the Amount anticipated to be covered by insurance, plus the Charge Amount and Frequency in which insurance is to be billed. The insurance amount is automatically subtracted from the guarantor's portion, and the guarantor's schedule (# of charges) is recalculated accordingly.
-
Enter the CDT for COT Claims required by the patient's insurance for continuation of treatment claims.
-
Verify the Proposed Payment Schedule in the next section. To adjust the schedule details, return to the previous sections.
A separate schedule is displayed for the guarantor and each insurance plan used in the contract.
If multiple insurance plans are being used for this contract, click Add Charge Schedule to display another set of entry fields for the next insurance plan. An insurance policy must be added to the Patient Record before you can select it in the contract.
-
Click Save Contract. You are prompted to activate the contract.
-
Select Activate Later to save the contract in a pending state and prompt the preparation of Pre-Authorization claims.
-
Select Activate Now to realize the down payment and begin applying the charge schedule defined in the contract.
Note: The contract is not active until you activate it. An Active status is required for posting, balance transfers, claims, and so forth, to occur.
Activating a Pending Contract
When you are ready to begin the work for a pending contract, select the contract from the list, and click Activate Selected Contract. When the contract is activated, a link is added to the Treatment Tracker in the banner of the patient’s Orthodontic Clinical Summary. The value in the Treatment field in the contract is displayed as the Current Tx. The Bonding/Tx Start Date and Est. Completion Date are used to calculate the Tx Track indicator, which provides a summary of the projected treatment time remaining.
If the patient's treatment is already in progress, contract activation automatically ends the current treatment and starts treatment tracking based on the currently-active contract.
Note: The Bonding/Tx Start Date for the contract must be the date you are activating the contract, or a previous date on which treatment began.

The initial charges are automatically posted to the patient's ledger. When you activate a contract that includes an insurance plan, an initial insurance claim is created automatically.
Setting Plan-Based Defaults for Ortho Coverage
Setting Up Automatic Payments in an Ortho Contract
Removing Automatic Payments from an Ortho Contract
Entering Advance Payments in an Ortho Contract