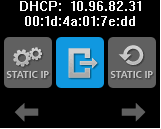
RVG Connect Menu
Navigating the Menu
To navigate the menu on the RVG Connect unit, follow these steps:
- Press the power and menu button briefly.
The menu is displayed. This example shows the network information at the top of the screen (see Network Configuration).

![]() and
and ![]() are displayed above the touch sensitive buttons.
are displayed above the touch sensitive buttons.
- Press the touch sensitive buttons on the front of the RVG Connect unit to navigate the menu.
- Press the power and menu button briefly again to select a menu item.
RVG Connect Menu Items
|
Icon |
Explanation |
|---|---|
|
Exits menu and returns to the main screen. |
|
|
Sets the default static IP address (192.168.17.3). See Assigning Default Static IP Address with Automatic Device Detection. |
|
|
Activates the DHCP configuration (automatic attribution of an IP address). |
|
|
Allows you to manually assign a static IP address. |
|
|
Displays the IPv6 address, prefix, and scope. This is useful if you are using IPv6 without Bonjour. By default, an RVG Connect unit has one IPv6 address (link-local). For an RVG Connect unit with several IPv6 addresses, the information is displayed on several screens. Press the touch sensitive button under |
Setting Up and Using RVG Connect for RVG 6200