Click the Open
Patient Chart  button. The
OrthoTrac Patient Lookup window
is displayed.
button. The
OrthoTrac Patient Lookup window
is displayed.
Select a patient and click OK.
Click the Schedule
Appointment  button. The Appointment
Summary window is displayed.
button. The Appointment
Summary window is displayed.
To schedule an appointment from a patient's chart:
Click the Open
Patient Chart button. The
OrthoTrac Patient Lookup window
is displayed.
Select a patient and click OK.
Click the Schedule
Appointment button. The Appointment
Summary window is displayed.
Click Schedule Appointment. The View Schedule window is displayed.

For practices with multiple locations, select the offices you want to display from the Schedule Offices standard.
Select the doctors who are available to see the patient from the Schedule Doctors standard.
To include all available appointment times in your search, skip to step #8. Otherwise, select one of the following time intervals from the Find Appointments standard:
Select an appointment type or procedure code from the Find Appointments standard. A list of available appointment times is displayed.
To refine your selections, click Edit Settings. The Searching for window is displayed.
Select from these fields:
Search these dates
Between these times
On these days
In these chairs
Search open slots
Click Start Searching. A list of available times is displayed based on the criteria.

Click an appointment time. The appointment information is displayed, including the patient name, the date, time, chair, type, time units, and any associated comments.
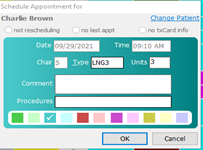
In this window, you can:
Select the color of the appointment
Select the procedures associated with the appointment
Access the OrthoTrac Patient Lookup window
View sibling appointments
Scheduling Appointments From the Main Menu
Changing Appointments Using the Clipboard