In the patient chart, click the
Schedule Appointment  button and then click Schedule
Appointment. The View Schedule
window is displayed, showing the Recalls
standard.
button and then click Schedule
Appointment. The View Schedule
window is displayed, showing the Recalls
standard.
The recall feature enables you to track patients who are not due back in your office for several months or a year. Recalls are also used for patients who need the first available appointment or patients who missed an appointment and need to reschedule.
Recall appointments are not real appointments; you do not see them on your schedule appointment book. The recall function lets you create a computerized tickler file to help you keep track of your recall patients. Then you can produce a list, labels, or recall cards for a specific month so that you can contact your recall patients.
Recalls can be scheduled only from the patient chart and can be automatically scheduled when you run the NoShow report.
To schedule a patient recall:
In the patient chart, click the
Schedule Appointment button and then click Schedule
Appointment. The View Schedule
window is displayed, showing the Recalls
standard.
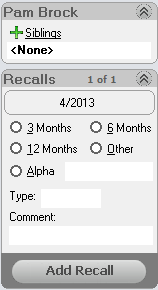
Select a time option or Alpha. Enter a type and a comment, and then click Add Recall. The Alpha and Type fields allow up to four alphanumeric characters; the Comment field is limited to 30 characters.
Close the View Schedule window.
Select the Recalls option. The recall appointments are listed.
To print the recall list:
Select Reports > Schedule > Recall List. The Print Recall List window is displayed.

In the Recall Date section, select an option:
Select Month/Year and type the month and year for which you want to print a recall list. Select Include Open Recalls, if appropriate.
Select Alpha and type the alpha code for which you want to print a recall list.
Select All Alpha Recalls to print a recall list for all alpha recalls.
In the Location section, select all locations or a specific location.
In the Recall Type section, select all recall types or a specific recall type.
Select Include Addresses to print addresses on the report.
In the Doctor section, select all doctors or a specific doctor.
Click Print.
Use the recall labels function to print labels for pre-printed recall cards.
To print recall labels:
Select Reports > Schedule > Recall Labels. The Recall Mailing Labels window is displayed.
In the Recall Date section, the Month/Year option is selected by default. Type the month and year for which you want to print recall labels, or select Alpha and type the alpha code for which you want to print recall labels.
In the Recall Type section, select whether to print labels for all recall types or a specific recall type.
In the Location section, select whether to print labels for all locations or a specific location.
In the Doctor section, select whether to print labels for patients of all doctors or a specific doctor.
Click OK.
You can print recall cards for patients with recalls in a specific month and year or a specific alpha recall code.
To print recall cards:
On the main menu, select Reports > Schedule > Recall Cards. The Recall Cards window is displayed.

In the Recall Date section, the Month/Year option is selected by default. Type the month and year for which you want to generate recall cards, or select Alpha and type the alpha code for which you want to print recall cards.
In the Recall Type section, select whether to print cards for all recall types or a specific recall type.
In the Location section, select whether to print cards for all locations or a specific location.
In the Doctor section, select whether to print cards for patients of all doctors or a specific doctor.
Click OK. The Recall Cards Messages window is displayed.
In the Messages section, select a recall message. The text for the recall message is displayed at the bottom of the Messages section.
Click OK. The Print Setup window is displayed.
Select the printer on which you want to print recall cards, verify the printer settings, and click OK.
Two default recall card messages are included in the software, but you can create your own messages.
To create a recall card message:
In the Recall Cards Messages window, select Add New. The Add Recall Card Message window is displayed.
In the Message Name field, type the name for the new message.
In the Message Text field, type the text you want to print on the recall cards. You can include merge fields in your message to insert patient information automatically. A list of merge fields can be found in the online help at Help > OrthoTrac Help > Recall Card Merge Fields.
Click OK.
The maximum length for a recall message is 255 characters.
To edit a recall card message:
In the Recall Cards Messages window, select the message you want to edit and click Change. The Change Recall Card Message window is displayed.
In the Message Text field, edit the text.
Click OK.
Scheduling Appointments From the Patient Chart
Scheduling Appointments From the Main Menu
Changing Appointments Using the Clipboard