Running
the Roll and Generating Statements
Generating and Printing Statements
To print account statements, on the main menu select Reports
> Financial > Statements. The Statements
menu is displayed.
The following options are available:
Generating Statements
To generate statement information:
On the main menu, select Reports
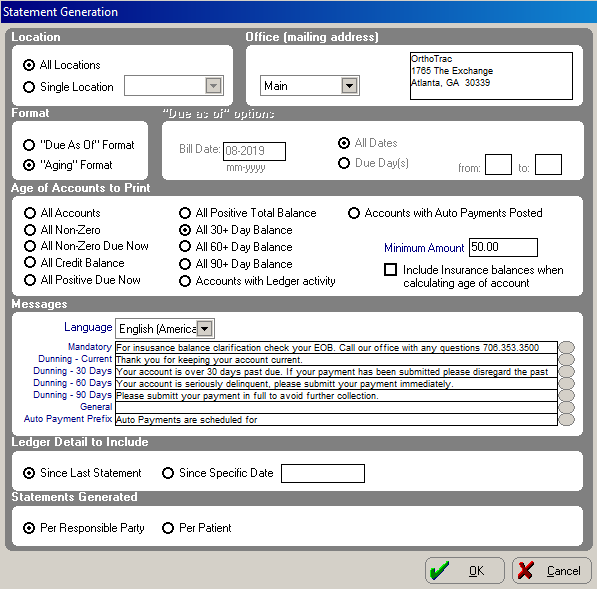
> Financial > Statements > Generate Statements. The
Statement Generation window
is displayed.

In the Location
section, select an option. If you select Single
Location, use the drop-down list to select the location from
the list.
In the Office
(mailing address) section,
select the mailing address you want to print on the statements.
In the Format
section, select the appropriate format:
Due As Of Format—Statements
are printed before accounts are rolled and include the next month’s
contract charges.
Bill Date field—Type
the month and year for the statements. This should be the next month
that the Monthly Roll posts contract charges. Select the All
Dates option to print statements for all due dates, or select
Due Day(s) and type dates
in the from: and to:
fields for a range of due dates.
Aging Format—Statements
are printed after accounts have been rolled.
In the Age
of Accounts to Print section, select from the following options:
All Accounts—All
accounts regardless of the balance.
All Non-Zero—Accounts
with a positive or a credit total balance.
All Non-Zero Due Now—Accounts
with a positive or a credit current balance. In the Minimum
Amount field, enter the account balance that you want to receive
statements.
All Credit Balance—All
accounts with a credit total balance. In the Minimum
Amount field, enter the minimum account balance that you want
to receive statements.
All Positive Due Now—All
accounts with a positive current balance. In the Minimum
Amount field, enter the minimum account balance that you want
to receive statements.
All Positive Total Balance—All
accounts with a positive total balance. In the Minimum
Amount field, enter the minimum account balance that you want
to receive statements.
All 30+ Day Balance—All
accounts with a positive 30+ day balance (including 60, 90+ day).
In the Minimum Amount field,
enter the minimum account balance that you want to receive statements.
All 60+ Day Balance—All
accounts with a positive 60+ day balance (including 90+ day). In the
Minimum Amount field, enter
the minimum account balance that you want to receive statements.
All 90+ Day Balance—All
accounts with a positive 90+ day balance. In the Minimum
Amount field, enter the minimum account balance that you want
to receive statements.
Accounts with Ledger activity—All
accounts with ledger activity receive statements. Select the Include Insurance lines when determining
ledger activity option to include insurance activity when determining
whether the account receives a statement.
Include Insurance balances when calculating age of account—Select
this option to include the insurance balance when calculating the
balance to determine whether the account receives a statement.
In the Messages
section, select the language and the type of message: Mandatory,
Dunning, General,
or Individual Responsible Party.
To enter a message, click the button to the right of the
appropriate message line. The corresponding message window is displayed.
Type your message and click Add,
or click Change to edit an existing
message. You can also click Remove
to delete a message. Click Close
to save the message.
In the Ledger
Detail to Include section, select from the following:
Since Last Statement
Since Specific Date
In the Statements
Generated section, choose whether you would like to generate
statements Per Responsible Party
or Per Patient.
Click OK.
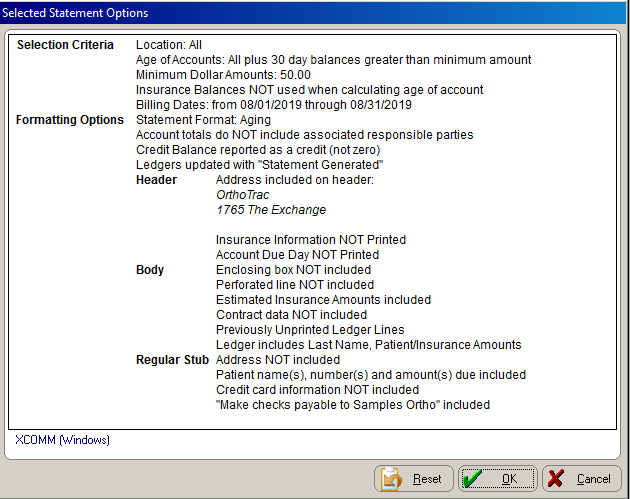
The Selected Statement Options
window is displayed.

Review the options and click OK to begin generating statements.
If some of the information is incorrect, click Reset
or Cancel.
After the software generates statements,
if you want to print the Post-Generation
Summary report, click Yes.
Tip: After generating and printing
the batch, print the exception/error list, make any corrections to those
accounts, and generate individual statements for responsible parties who
did not receive a statement from the initial batch generation.
Related Topics
Running the Financial Roll
Printing/Viewing Statements
Working with Generated
Statements
Generating an Individual
Statement
Correcting
Errors After Generating Statements
Skill Sharpeners


