Using the Perio Chart
![]() Related Training
Related Training
Using the Perio Chart Recorded Class
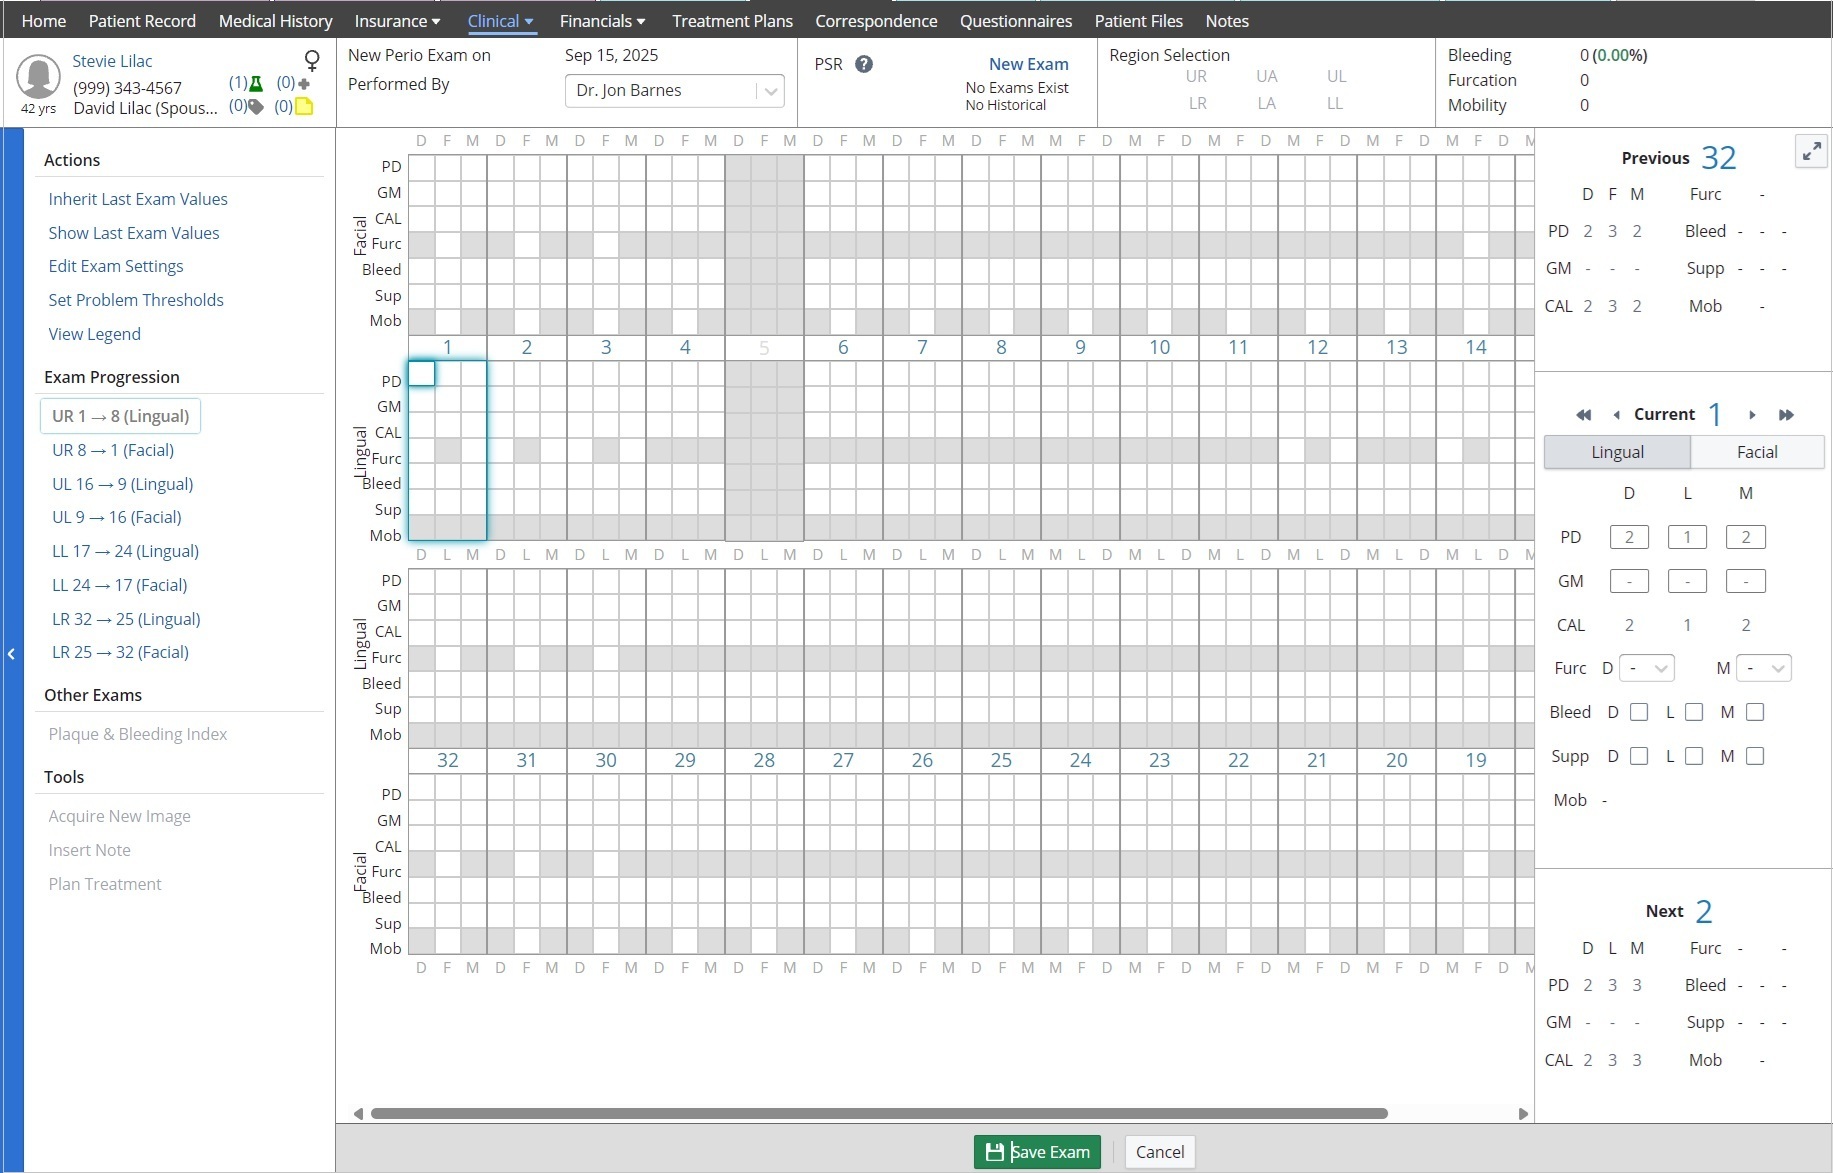
To chart a Perio exam:
-
On the Patient tab, select Clinical > Perio Chart.
-
Under Actions, click Record New Exam. The Perio Chart window is displayed.
Note:
--A patient can have only one recorded perio exam on a given day. This exam can be edited, but there cannot be an additional exam recorded on the same day.
--If a previous perio exam exists for the patient, you have the option to click Inherit Last Exam Values from the Actions menu. When this option is clicked, a message is displayed with the options to Inherit Remaining Values, Inherit All Values, or No if you want to cancel the action.
-
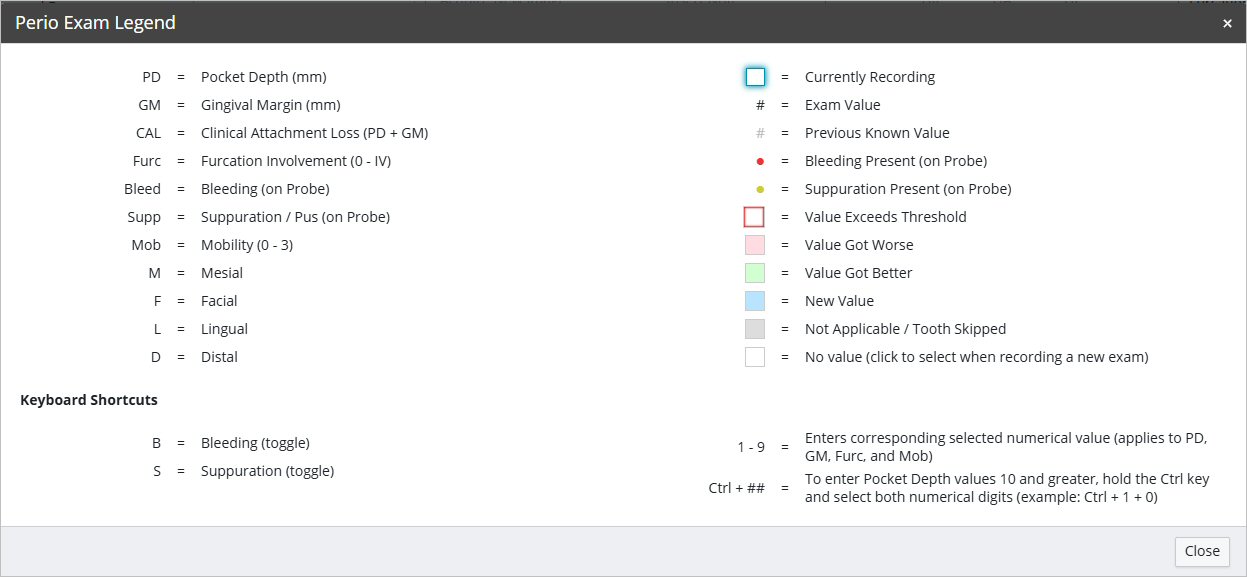
To view the perio charting options—abbreviations/colors and their meanings—click View Legend. The Legend is displayed.
-
Begin charting the lingual and facial pocket depth, gingival margin, furcation, bleeding, and so on, in the chart. Chart the perio values by clicking in the tooth entry fields and entering numeric values. You can view the Previous, Current, and Next tooth in the control panel on the right side or navigate directly to a specific point in the exam by clicking on a specific cell within a tooth.
--You can also click on the tooth number or use the arrow buttons in the Current section to move between teeth. The order of the perio exam progression is user-specific based on the exam settings. See Additional Actions & Settings for more information.
--Select the team member performing the exam from the Performed By drop-down menu.
--Easily switch between Lingual and Facial by using the buttons in the control panel.
--You also have the ability to record pocket depths (PD) and gingival margin (GM) readings per pocket site. Clinical attachment loss (CAL) is the sum of the pocket depth and gingival margin.
Note: You can record double-digit pocket depths by pressing and holding the Ctrl key on your keyboard and then typing the number (e.g., 11 = Ctrl + 11).
--The presence of bleeding & suppuration can be noted (per pocket site).
Tip: There are keyboard shortcuts that can be used to indicate bleeding or suppuration.
For bleeding, simply press the B key on your keyboard to quickly indicate bleeding for a pocket site. Press the B key again to remove the indicator.
For suppuration, press the S key on your keyboard while in the pocket depth (PD) column. This is displayed as a yellow dot. Press the S key again to remove the indicator.
If you are entering the chart solely using a keyboard, press the B or S key before entering the pocket depth number.
--Additionally, Furcation (1-4, where applicable) and Mobility (1-3) grades can be assigned per tooth.
Tip: Click the Expand/Collapse icon to expand the chart to full-screen mode while entering data. Click the icon again to return to regular view.
Note: If you navigate to another area of the software while perio charting, a message is displayed asking if you want to Stay & Edit, Abandon Changes & Leave, or Save Changes & Leave. -
When charting is complete, click Save Exam.
Note:
--When the exam is saved, you can review the exam findings and add a note by clicking Insert Note under the Tools section on the left side panel. Keep in mind that these notes are specifically associated with the perio exam record and do not appear in the history of other clinical charts (e.g., Hard Tissue Chart/Dental Chart).
--To edit the exam, click Edit Exam from the Actions menu.
Additional Actions & Settings
In addition to recording new exams, you can also perform the following from the Actions menu:
-
Delete Exam
-
Print Exam
Note: You can select to Include Perio Exam Notes, if needed. -
Show Last Exam Values: Click this option to show values from the last exam. You can then click Hide Last Exam Values to hide them.
-
Edit Exam Settings: Here you can set how you want to probe in the patient's mouth and what path you want to take.
--Select if you work by Arch or Quad.
--Select if you work from Facial-to-Lingual or Lingual-to-Facial.
--Select if you work from Top-to-Bottom or Bottom-to-Top.
--Select if you work from Right-to-Left or Left-to-Right.
--Select a direction for probing when completing the facial or lingual side of an arch or quad.
--Select an order to start from when transitioning between arches.
--Select any conditions/restorations you do not want to probe. -
Set Problem Thresholds: Here you can choose what you want to be flagged in the chart.
--Select Yes to flag issues on the perio chart.
--When this setting is enabled, you can select the problem thresholds for Pocket Depth, Gingival Margin, Clinical Attachment Loss, Furcation Involvement, and Mobility.
Note: If the problem thresholds are set, any problematic values (i.e., higher pocket depth than the set threshold) are displayed in bold red text. -
View Legend: View what the abbreviations and different colored boxes and circles denote in the chart.
From the Tools menu, you can:
-
Acquire a new image -- This option takes you to the patient's clinical images
-
Insert a Note for the current perio chart
-
Plan Treatment -- This option takes you to the patient's hard tissue chart/dental chart
Note: Use the PSR section at the top of the screen to record a PSR.
Using the Clinical Chart (EMR)
Using the Clinical Chart (EMR)