Using the Appointment Book
The Appointment Book defaults to the current date and the default Appointment Book.
Toolbar
Use these buttons to perform common functions.

-
Access the Person Pick List.
-
Make an appointment.
-
Make an appointment for a new patient.
-
Display the Appointment Overview.
-
Access Pending Appointments.
-
Select the person on the phone.
-
Enter individual and bulk payments.
-
Show/hide names on the Appointment Book (privacy mode).
-
Display Practice Central.
-
Access the CareCredit integration.
-
Access Yellow Stickies.
Fore more information, see Using the Toolbar and Adding a Yellow Sticky Note.
Book Selection
The Appointment Book currently displayed is indicated at the top of the window:
![]()
-
Use the arrows to scroll through the different books.
-
Click the Home icon to return to the default book.
-
Click the underlined name to display the Select Appointment Book to View window. Use this window to Edit or Add books.
Calendar and Dates
The current date is displayed in the top of the window. Use the Calendar icon next to the date to show or hide the Calendar. 
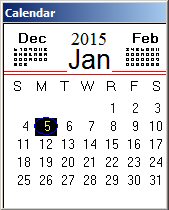
Use the Calendar to select a date to display. Click on the previous or next month located in the upper corners to turn to that month. You can keep clicking the next or previous months to scroll back and forth throughout the year.
The current date is circled in blue. The date displayed on the Appointment Book has a black square on it.
Use the buttons at the top to display future dates or return to the current day.

- You can customize these buttons for each appointment book from the Appointment Book Definition window.
(Appt Book > Different book... [select book] > Edit) For more information, see Defining Books.
Time Tracker
![]()
The Time Tracker is a red line that lets you know exactly where you are in the current day. The line extends the width of the appointment book on the current day. For pending and future dates, the line is displayed in the Time column on the left.
Scheduling Time Blocks (Block Booking)