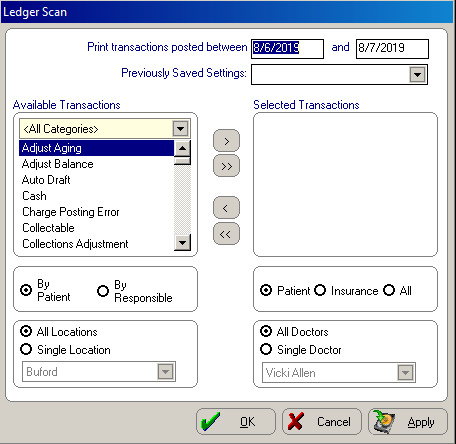
The Ledger Scan report prints a list of ledger transactions and amounts for a specified time period by patient or responsible party. You can select the transaction types to print on the report and filter the report so it yields only transactions belonging to the patient’s insurance, responsible party, or both.
You can also specify whether the report should be for all locations and all doctors, or a particular location or doctor. The report options can be saved for future use.
To use the Ledger Scan report:
On the main menu, select Reports > Financial > Ledger Scan. The Ledger Scan window is displayed.

Type the dates for which you want a report in the fields at the top of the window.
In the Available Transactions section, select each transaction you want to include in the report by highlighting the transaction and clicking the single right-arrow button.
In the remaining sections, select whether you want to generate a report By Patient or By Responsible; for All Locations or a Single Location; for Patient, Insurance, or All; and for All Doctors or a Single Doctor.
Click OK and Print.
After running a Ledger Scan report, you can save the settings to enable you to run the report in the future.
To save the Ledger Scan report settings:
After running the report, click Apply. The Save Options window is displayed.
Type a name for the report in the field and click OK. The report name and settings are saved.
To run a report using the same settings, click the arrow next to the Previously Saved Settings field and select the report name from the list.