Working with Images > Drawings, Measurements, and Annotations
Rotating an Object
To rotate an object, follow these steps:
-
Open the image in the Image Viewing Workspace or Darkroom mode.
-
In the
 Drawings & Annotations toolbar, click
  .
. -
In the image, move the mouse pointer over the object you want to rotate. The pointer changes to
 .
. -
Click on the object to display square grab handles.

-
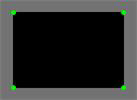
Click a second time on the object to display green rotation grab handles.

-
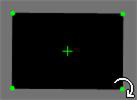
Move the pointer over a green rotation grab handle. The mouse pointer changes to
 .
. -
Click on the rotation grab handle and drag the object to a new position. The selected object is rotated. As the object rotates, the center of rotation is indicated by a “+”.

Drawings, Measurements, and Annotations
Drawing a Multi-Segment Line (Polyline)
Adding a Text Annotation to an Image
Using the Undo and Redo Functions
Changing Object Color and Line Thickness
Using Measurements to Calculate Distances and Angles
Using the Densitometric Analysis Tool