.
.To prepare the unit:
Turn on the PC.
On the unit column, press the ON button and wait for the connection to the PC to be established.
Start the imaging software and access the Acquisition window:
To access the Panoramic
Acquisition window, click .
To access the 3D Acquisition
window, click  .
.
Set the acquisition parameters:
In the Acquisition window, click the Program button to access the Program pane. Click on the section of the jaw to select the anatomical zone, such as panoramic, TMJ x2, or sinus.
Click the Patient button to access the Patient pane. Select the patient type, dental arch morphology, and incisor orientation.
If the default parameter settings are not adapted to your patient type, click the Parameter button to access the Parameter pane and select the appropriate parameters.
µm (Voxel)—For a 3D image, select the appropriate µm parameter. The higher the image resolution, the greater will be the image data size.
kV and mA—For a 3D image, select the appropriate kV and mA parameters.
To save the new settings as the default, click  and select Memorize
settings.
and select Memorize
settings.
Position the appropriate chin rest on the chin rest support and cover the bite block with a hygienic barrier. If needed, use the edentulous bite block.
Press and hold  to raise the chin rest to the appropriate position.
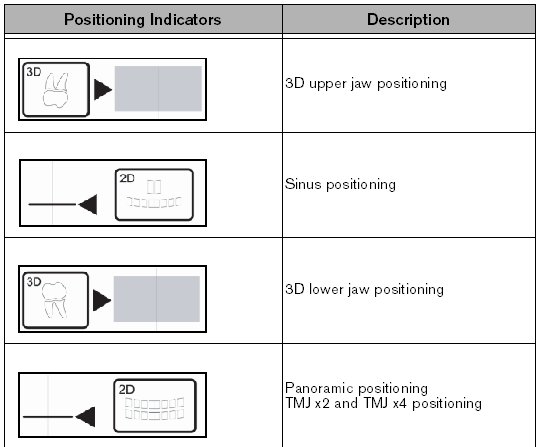
The following table shows the positioning indicators, which are located on the base of the chin rest: