To prepare and position the patient:
Ask the patient to remove all metal objects.
Ask the patient to wear a lead apron. Be sure the apron is flat across the patient’s shoulders.
Press and hold the height adjustment buttons to raise the chin rest to the maximum height. Ask the patient to enter the unit.
Note: If the patient is tall, ask him to sit on a stool and then adjust the chin rest.
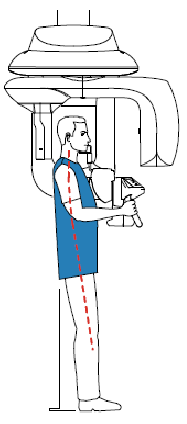
Ask the patient to:
Stand with feet slightly forward.
Grip the lower handle with the palms up.
Rest the chin on the chin rest support and bite into the bite block.
Relax the shoulders for full motion of the unit rotative arm.
Note: Correct posture reduces the shadow of the spinal column transferred to the image.
On the control panel, click  to turn
on the two positioning laser beams:
to turn
on the two positioning laser beams:
Mid-sagittal plane positioning laser beam (1) for a vertical alignment
Horizontal plane positioning laser beam (2) for a Frankfort plane alignment
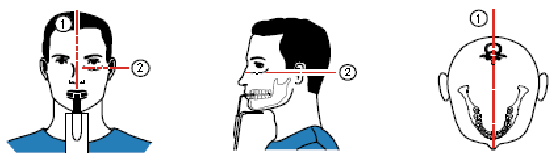
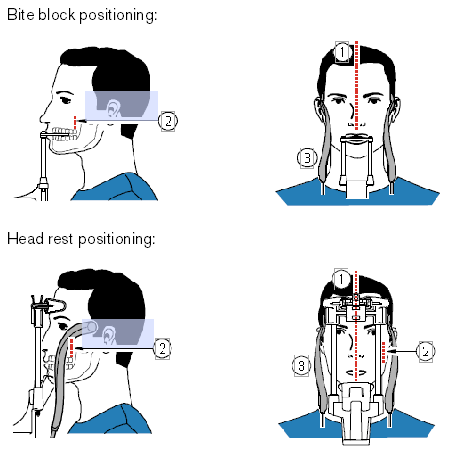
Correctly align the Frankfort and mid-sagittal planes using the height adjustment buttons and the adjusting wheel.
Immobilize the patient’s head with the temple supports (3).
Ask the patient to:
Close the eyes.
Remain still.
Swallow and place the tongue against the palate.
Breathe through the nose.
To prepare and position the patient:
Position the 3D head rest or 3D bite block.
Press and hold  to raise the chin rest to the following positioning indicators:
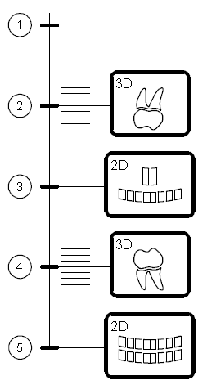
Note: The higher the chin rest base, the lower the area of interest.
Use the 3D bite block or the 3D head rest to position the patient.
For the bite block method:
Ask the patient to open the mouth.
Ask the patient to bite gently and naturally into the bite block without joining the incisors.
Center the upper incisors with the bite block.
For the head rest method: Ask the patient to place the chin into the chin rest and press the forehead into the head rest.
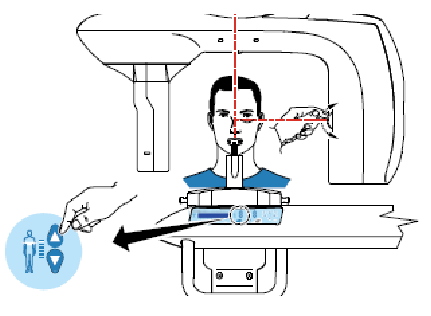
On the control panel, click  to position
the unit rotative arm to the correct 3D position.
to position
the unit rotative arm to the correct 3D position.
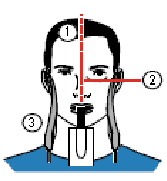
On the control panel, click  to turn
on the positioning laser beams. Use the mid-sagittal (1) and the 3D
FoV (2) positioning laser beams.
to turn
on the positioning laser beams. Use the mid-sagittal (1) and the 3D
FoV (2) positioning laser beams.
Note: You can re-activate the laser beams as needed. Press the same button to turn OFF the laser beams, or wait 60 seconds for the beams to turn OFF automatically.
Press and hold  to align the upper or lower jaw with the 3D FoV (2) laser beam. Tighten
the temple supports (3) using the temple support adjusters.
to align the upper or lower jaw with the 3D FoV (2) laser beam. Tighten
the temple supports (3) using the temple support adjusters.
Ask the patient to:
Close the eyes.
Remain still.
Breathe through the nose.
Keep the tongue still.