Software Overview > Acquisition Interface
Panoramic Acquisition Interface Overview
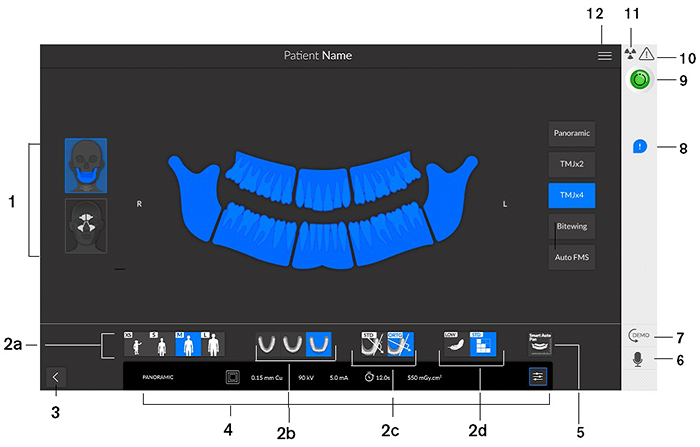
The Panoramic Acquisition interface for the CS 9600 provides you with 2D imaging acquisition functions.
Figure 7 - Panoramic Acquisition Interface

 |
IMPORTANT: R indicates that it corresponds to the right side of the patient who is facing the operator. |
|
1 |
Program pane and Preview screen - Displays the choice of programs and enables you to choose different radiological exams according to the unit edition that you have. |
||
|
2 |
Selected parameter display - Displays the current acquisition parameter settings:
|
||
|
|||
|
3 |
Exits the acquisition interface. |
||
|
4 |
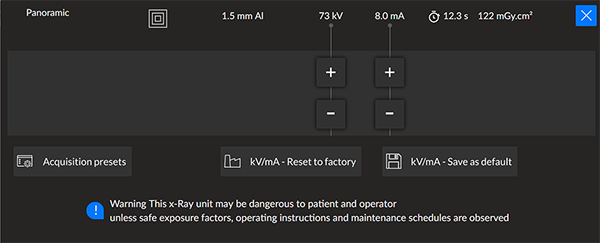
2D Exposure parameter panel: Enables you to choose and save exposure parameters for the radiological image acquisition as default settings.
|
||
|
5 |
SmartAuto Pan (optional):
|
||
|
6 |
Microphone: Enables you to communicate with the patient by clicking it or by pressing on the space bar. |
||
|
7 |
Demo: Enables you to demonstrate the acquisition procedures to a patient without the X-ray. |
||
|
8 |
Accessory notification: Will appear on the interface if you do not use a positioning accessory that corresponds to an acquisition. |
||
|
9 |
Ready indicator:
|
||
|
10 |
Warning - Indicates that you must consult the accompanying document. |
||
|
11 |
Ionizing radiation:
|
||
|
12 |
Menu - Provides access to the following sub-menus: General Settings, DICOM Settings, 2D-3D kV/mA Reset to factory, Quality Check History, Shutdown / Restart, About. |
2D Quality Control Interface Overview for the Dental Environment
3D Acquisition Interface Overview
3D Quality Control Interface Overview for the Dental Environment
DICOM Worklist Interface Overview
2D Quality Control Interface Overview for the DICOM Environment
3D Quality Control Interface Overview for the DICOM Environment

