The appointment book is the electronic equivalent of a paper appointment book. You can create as many appointment books as you need, and each appointment book can have its own office hours.
To set up an appointment book:
Name chairs
Assign colors
Define books—Includes the following tasks:
Name a book
Add chairs to a book
Identify days that the office is open
Establish office hours
Define the navigation tabs on the appointment book
To define a new appointment book:
OR
Click Different Book.
The Select Appointment Book to View window is displayed.
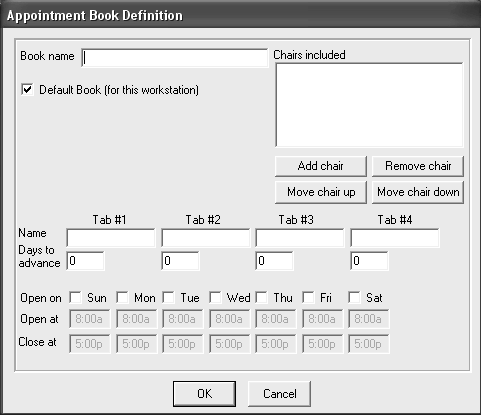
In the Book name field, type the name of the book.
In the Chairs included field, click Add chair. The Select chair to add to this book window is displayed. It lists all of the chairs that you added during configuration.
Select the chair that you want to add to this book, and click OK. Repeat steps 4 and 5 until you have added all of the chairs that you want.
Type the name to appear on each of the four tabs; for example, +1 Day, +1 Week, +1 Month, and +6 Months.
Type numbers in the Days to Advance fields that correspond to the names you assigned to the tabs.
Select each day that the office is open.
In the Open at and Close at fields, type the opening and closing hours for each business day.
Click OK.
To switch appointment books:
Click Different Book on the toolbar. The Select Appointment Book to View window is displayed.
Select the appointment book you want, and click OK.
To return to the original appointment book, click the Use most recent book ![]() icon.
icon.
Setting Up Statements and Messages