
To set up your statements:
Select File > Preferences > Statement Setup. The Office Wide Statement Setup window is displayed.
Specify the following options when configuring statements:
Should we print—Which statements should be printed.
Billing cycle—When statements should be printed.
Monthly—Accounts receive a statement once a month.
In days—Accounts receive statements more than once a month. Enter the number of days between statements.
Day of month—Type the date that you want statements to print each month. If you normally print statements on the first day of each month, enter a 1 in this field. If you are sending statements once a month, be sure to deselect Reset when insurance payment is received and Reset when balance is paid.
To set up daily statements, enter a 0 in this field. Be sure to check Reset when insurance payment is received and Reset when balance is paid.
What to print—Select each data item you want to print.
Charges to add
Walkout statement options
You can create messages that print on statements automatically.
To create or edit statement messages:
Select File > Preferences > Statement Messages. The Statement Messages menu is displayed.
Click an option to create a new message or edit an existing message. For example, select Amount due and date messages, and the Statement Amount and Due Date Messages window is displayed.
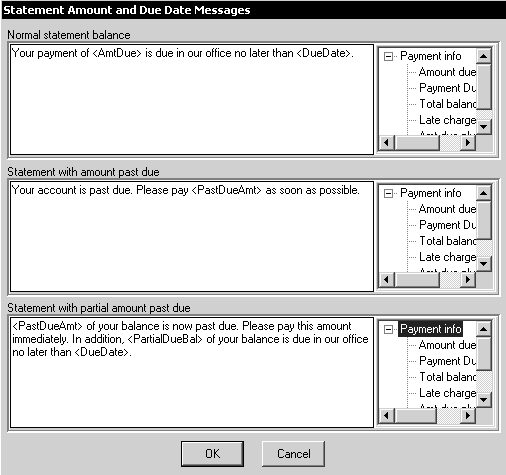
Three messages are displayed:
Normal statement balance
Statement with amount past due
Statement with partial amount past due
The current message is displayed on the left. Each message contains conventional text and one or more variables, which are included in angle brackets. A variable is a value that changes from statement to statement, such as amount due or due date. The panes on the right display the variables that you can use when you edit a message.
To edit a message:
Click inside the message you want to edit and enter or delete text.
To insert a variable, click where you want the variable inserted, and then double-click the variable on the right that you want to insert.
Click OK.
You can send a post card message to remind a patient of an upcoming appointment.
To create a post card message:
Select File > Preferences > Post card messages. The Post Card Messages menu is displayed.
Select an option.
Create or edit the message.
When you add a new patient to the software, your office-wide recall default settings determine the patient’s recall status. After the patient has had treatment, you can change the recall settings for that patient, based on the patient’s needs.
To set up default values for recall:
Select File > Preferences > Recall Defaults. The Office Wide Recall Defaults window is displayed.
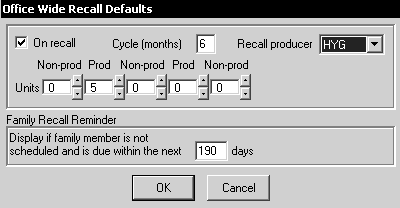
Select On recall if you want your patients to come in for regular cleanings.
Enter a number in the Cycle (months) field to indicate how frequently to recall patients. The default is 6.
From the Recall producer drop-down list, select the producer.
In the Units fields, enter the number of time length blocks for producers and non-producers. The sum of these time blocks determines the amount of time that should be scheduled for the appointment.
Enter a number in the Family Recall Reminder field to display a reminder that a patient, or a family member, is due for a recall appointment.
Click OK.
You can set up messages for treatment proposals.
To access and edit these messages:
Select File > Preferences > Tx proposal messages. The Treatment Proposal Messages window is displayed.
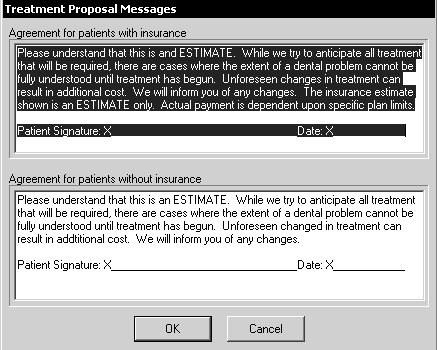
Edit the messages.
Click OK.
You can set up messages for payment plans.
To create or edit these messages:
Select File > Preferences > Payment plan messages. The Payment Plan Messages window is displayed.
Type or edit the message to be printed on payment plans in the text area.
Click OK.
Setting Miscellaneous Defaults