Getting Started
Using the Lookup Window
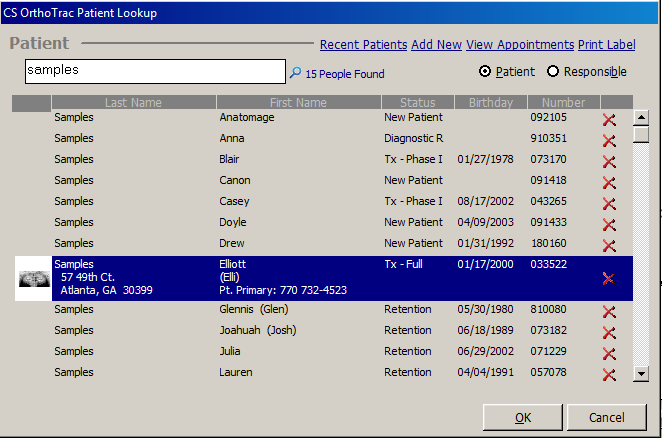
The lookup window enables you to sort through lists of patients, doctors,
and so on. The following OrthoTrac Patient
Lookup window shows the basic functions of the lookup window.

To access the OrthoTrac Patient Lookup
window, click the Open Patient Chart
button on the main menu.
Accessing
Records
You can access records using the following search methods:
Search by First or Last Name—Type
a full or partial first or last name in the search field, highlight
the name, and click OK.
Search by Partial Last Name/Partial
First Name—Type the first few letters
of the last name, a comma, and then the first few letters of the first
name in the search field, highlight the name, and click OK.
For example, to search for John Smith, type Sm,
Jo.
Search by Combined Middle Name/Last
Name—To differentiate between
patients with the same first and last name, you can configure the
software to list a patient’s middle name or middle initial before
the last name in lists.
Search by Patient or Responsible Party—Type
a patient’s or the responsible party’s first, middle, last, or common
name; account #; phone #; email address; insured ID; or Social Security
number. Highlight the name and click OK.
Adding and Removing Records—To
add a record from the lookup window, click Add
New.
To remove a record from the Lookup
window, select the record, click the red X,
and provide a reason for removing the record. Then click OK
and Yes.
Printing
Labels
To print an individual mailing label, chart label, or appointment label
using a stand-alone label maker:
In the OrthoTrac
Patient Lookup window, select the name for which you want to
print a label and click Print Label.
The Individual Label window
is displayed.
Select the type of label to print.
Make changes to the appearance of
the label, if necessary, by selecting from the drop-down lists in
the Font and Size
fields and by clicking the Bold,
Italic, and Underline
buttons.
Select an option from the drop-down
list in the Selected Printer
field, or click Setup to display
the Print Setup window and
change the options for the printer.
Click OK.
Related Topics
Accessing the Software
Using the Main Menu
Using the Patient Chart
Skill Sharpeners

