Working with the Patient Flow Module
When you move a patient from one location to another, the software tracks the time the patient spends in the new location. Depending on the way their computers are configured, other staff members can view the patient’s new location on their monitors.
If you purchased the Charting module, you can configure the software to automatically load the Charting module when patients are moved to the operatory. You can also set up the software so that Patient Checkout is automatically loaded when patients are moved to Check Out.
To change a patient location:
Select one of the following methods of changing a patient’s location:
Dragging and dropping
Double-clicking
Right-clicking
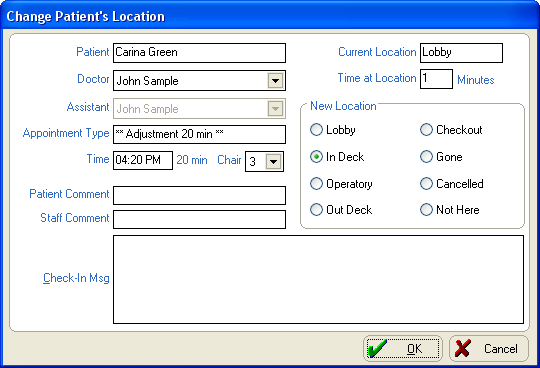
After moving a patient, the Change Patient’s Location window is displayed.

The Change Patient’s Location window displays information about the patient’s appointment. The patient’s name, appointment type, time and length of procedure, current location, and time at location are view-only.
The Change Patient’s Location window is displayed only if you have enabled it. To enable this window, select Maintenance/Set-up > Patient Flow Options > Grid Setup > Display Change Patient Location.
In the Doctor, Assistant, and Chair fields, use the drop-down lists to change the information, if necessary.
To add or change a message in the Patient Comment, Staff Comment, or Check-In Msg fields, type the message in the appropriate field.
The patient sees the Patient Comment as soon as he checks in. Enter only the comments you want the patient to see.
If you move a patient to the same destination or to a destination that is earlier in the sequence than the current location—for example, Operatory to Lobby—the software displays a confirmation message. If you click Yes, the time already recorded for that patient in that location is lost.
If you have checked in a patient in error, cancel the check-in by changing the location to Not Here.
When you drag and drop a patient, the location you dropped the patient in is selected in the New Location section. Click OK.
With the double-clicking or right-clicking methods, the software automatically selects the next location; for example, if the patient was in the Lobby, and you use the In Deck option, then In Deck is selected. Click the desired location and click OK.
Checking In Patients with Check-In Messages