Using the CS 1200, CS 1500, and CS 1600 Intraoral Cameras
Using the Wired Camera
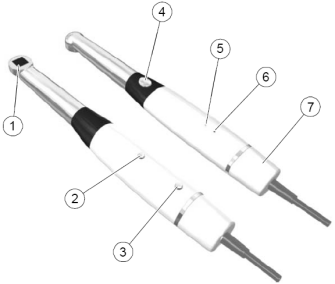
See the diagram and table for wireless camera components.

|
Number |
Component Name |
Description |
|
1 |
LED and lens window |
Use to illuminate the oral cavity. |
|
2 |
Power button |
Press for 3 seconds to power on the camera. Press for 5 seconds to power off the camera. |
|
3 |
Cable Release button |
Press button and pull to release the cable. |
|
4 |
Shutter Release button |
Press halfway down to automatically focus the camera. Press completely and release to use video mode. |
|
5 |
Power indicator |
A green light indicates the camera is powered on. The camera is powered off is not light is visible. |
|
6 |
USB Connection indicator |
A solid blue light indicates the connection is complete. A blinking blue light indicates the connection is in progress. |
|
7 |
Cable |
Insert cable into the bottom of the camera until it is securely in place. |
Using the CS 1200, CS 1500, and CS 1600 Intraoral Cameras
Acquiring Intraoral Camera Images