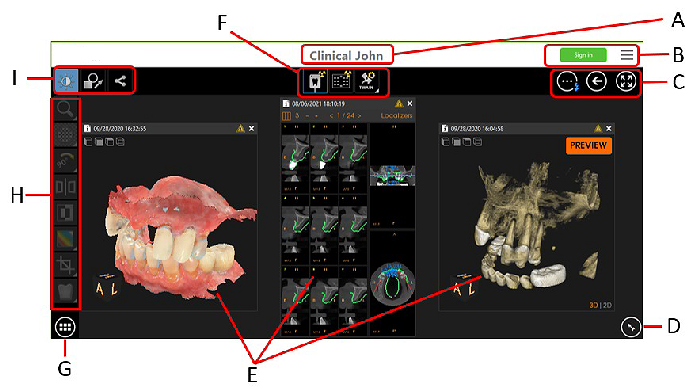
Image Viewing Workspace Overview
The Image Viewing Workspace provides tools for acquiring, reviewing, and analyzing images.

|
A |
Title bar |
Displays the name of the selected patient. |
|
B |
System icons |
These icons allow you to access Sign in, What's New, Preferences,
Note: You can select the language for the user guide in the General Preferences. |
|
C |
Navigation icons |
Icons that you use to access Image Viewing Workspace screen options, the Patient Browser, Dashboard and the Darkroom mode. |
|
D |
Control Panel |
Contains the Image Processing, Histogram and Dental Arch tools. See Using the Control Panel. |
|
E |
Image windows |
Images are displayed in separate windows. You can resize a selected image window by moving the mouse pointer to the window border. When the mouse pointer changes to a double arrow, click and drag the window border to resize. See Arranging Images. |
|
F |
Image Acquisition toolbar |
Contains buttons you can click to access your equipment. |
|
G |
Image Gallery icon |
Click to display thumbnails of the acquired images and objects for the selected patient. See Using the Image Gallery. |
|
H |
Dropdown toolbar |
The toolbar displayed depends on the button you select in the Toolbar Selector. Note: The white triangle in the lower-right corner of some icons means there is an icon group available. See Using Icon Groups. |
|
I |
Toolbar selector |
Toggle between the buttons to view the Drawings & Annotations, Image and Share toolbars. See Using the Toolbars in the Image Viewing Workspace or Darkroom Mode. |
Patient Browser and Dashboard Overview