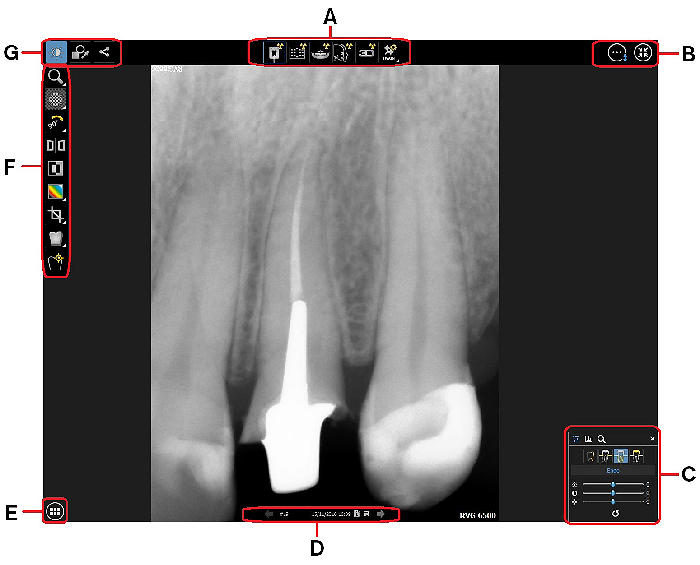
Darkroom Mode Overview

|
A |
Image Acquisition toolbar |
Contains buttons you can click to access your acquisition devices. See Acquiring an Image Using the Acquisition Toolbar. |
|
B |
Navigation icons
|
Icons that you use to access the Darkroom mode screen options and Image Viewing Workspace. |
|
C |
Control Panel
|
Contains the Image Processing, Histogram, and Dental Arch tools. See Using the Control Panel. |
|
D |
Image title bar |
Contains the acquisition date and time, toggle buttons for navigating between images, and icons to access the Image Information window and save image changes. See Overview of the Image Title Bar. |
|
E |
Image Gallery icon |
Click to display thumbnails of the acquired images and objects for the selected patient. See Using the Image Gallery. |
|
F |
Dropdown toolbar |
The toolbar displayed depends on the button you select from the Toolbar Selector (G). Note: The white triangle in the lower-right corner of some icons means there is an icon group available. See Using Icon Groups. |
|
G |
Toolbar selector |
Toggle between the buttons to view the Drawings & Annotations, Image and Share toolbars. See Using the Toolbars in the Image Viewing Workspace or Darkroom Mode. |
For more information on this mode, see Using the Darkroom Mode.
Patient Browser and Dashboard Overview
Image Viewing Workspace Overview