Drawing a Trace along a Dental Arch
The Curve tab enables you to draw a trace along the jaw arch or temporal bone, and to display a reconstructed-panoramic view and movable Coronal Slice View Screen through the trace.
This section describes the procedure for drawing a trace along the dental arch.
To draw a trace along the temporal bone, see "Creating a Temporal Bones View".
Before you start
In CS 3D Imaging, open the patient image volume on which you wish to trace a dental arch.
To draw a trace along the dental arch of a patient image volume, follow these steps:
-
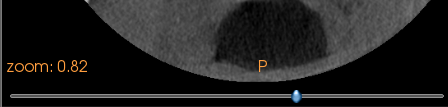
In the Curve tab, adjust the position of the axial slice plane in the Axial Slice View Screen to the relevant position in the volume.
To do so, click and drag the slider at the base of the Axial Slice View Screen to display the anatomical region you are interested in.
|
|
Note: Once the trace has been drawn and you double-click to validate it, the slider will disappear. |

If you need to reposition the axial slice once the trace has been drawn, click and drag  in the Reconstructed Panoramic/Trace View Screen or Coronal Slice View Screen.
-
In the Tools pane, do one of the following:
-
Click
 to activate the manual tracing tool.
|
|
Note: If the Automatically create an arch function is enabled in the “MPR Preferences”, when you click the Curve tab for the first time, a jaw arch is automatically created for you. |
-
In the extended scroll list, click to automatically trace a dental arch. When the automatic trace has been drawn, you can fine-adjust the trace manually as required. See “Adjusting a Trace”.
The icon is highlighted in blue ![]() to show that the tracing tool is activated.
to show that the tracing tool is activated.
You can disable this function in the “MPR Preferences”.
-
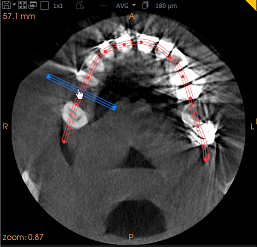
In the Axial Slice View Screen, click points along the jaw arch to place the red control points of the trace.
|
|
Note:
You can adjust the control points manually after the trace has been drawn. The trace is drawn in red, and the Reconstructed Panoramic View Screen and Oblique Coronal Slice View Screen are activated and dynamically updated as the trace is drawn. |
-
As you finish tracing the dental arch, double-click to set the last control point of the trace. The trace is drawn, and an entry is created in the object list in the expanded Tools pane.
-
Click
 to turn off the tool.
|
|
Tip: In some cases, if you draw a trace on an image with a large field of view, the software will automatically crop the image vertically during processing. If this happens, you can reposition the region of Interest limits once the trace has been drawn. For more information, see "Using the Basic Region of Interest Tool". |

Tracing Simultaneous Jaw Arches
During the treatment process where multiple jaws are involved, the shapes of each jaw are different and as a result, the arch tracing for both must be enhanced.
1. Trace the first arch.
2. Click twice in the toolbar to name the first arch.
3. Next, unselect the tracing tool.
4. Take the axial plane and move it to adjust the next arch, and trace it.

5. Name the second arch.