Aligning a Model with a Volume
The CS 3D Imaging software's Automatic Model Alignment module integrates easily into your Prosthetic-Driven Implant Planning (PDIP) workflow, to enhance the planning of virtual crowns and implants.
CS 3D Imaging Automatic Model Alignment provides:
-
Automatic alignment of a model with a patient image volume
-
Easy-to-use tools to manually adjust the automatic model alignment
Before You Start
Before aligning a model with a patient image volume, follow these steps:
-
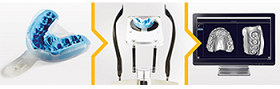
Take a 3D x-ray scan of the Field of View using a Carestream Dental systems CBCT unit (CS 8200 3D & CS 9600 Families). For recommended Fields of View, see "Using the Prosthetic-Driven Implant Planning Workflow ".
-
Take a 3D digital impression of the patient's dental arch using a Carestream Dental CBCT unit (CS 8200 3D & CS 9600 Families) or CS Intraoral scanner, or use a previously imported 3D digital impression from CS Imaging 8 software.
-
Open the patient image volume in CS 3D Imaging, and in the Curve tab draw a trace along the dental arch.
Using the Prosthetic-Driven Implant Planning Workflow
Before matching a Model to a patient image volume, make sure you have carried out the following:
-
Take a 3D x-ray scan of the region of interest using a Carestream Dental CBCT unit (CS 8200 3D & CS 9600 Families). The following Carestream Dental CBCT units and Fields of View (FoV) are specifically adapted for this use:
|
Carestream Dental CBCT unit |
CS 9600 |
CS 8200 3D
|
|
Field of View (Jaw) |
jaw 8x8, 12x10, 10x10 16*10 - mandibula and maxilla 8x5, 12x5, 10x5 |
jaw 8x9 (or 8x8), 12x10, 10x10 - mandibula and maxilla 8x5, 12x5, 10x5 |
|
Field of View (Head) |
16*12, 16*17, 16*10, 12*10 |
NA |
|
Acquisition mode |
LD STD HR |
LD STD HR |
|
|
Important: During the scanning process, make sure that the patient is not in occlusion. Follow the guidelines for using your CBCT device. To facilitate data registration, ask the patient to use the appropriate 3D bite block during the X-ray acquisition process. |

Carry out a classic evaluation of the region of interest and take necessary measurements.
-
To take a 3D digital impression of the patient's dental arch, do one of the following:
-
Generate the 3D model from a conventional impression (silicon or alginate) obtained using a Carestream Dental CBCT Unit's 3D object acquisition module.
-
Take an intraoral digital impression using the CS 3700 or CS 3800 IO scanner.
|
|
Important: HD color rendering is available only with 3D models acquired using intraoral scanning. |
|
|
Note: The following acquisition modes can be used to perform a digital impression adapted to the PDIP workflow:
|

-
Open the patient image volume in CS 3D Imaging.
-
In the Curve tab draw a trace along the dental arch. See “Drawing a Trace Along a Dental Arch”.