Acquiring Single Image Using RVG Connect
To acquire a single image using RVG Connect, follow these steps:
- Tell the patient to remain still.
- Position yourself either two meters behind the X-ray source or outside the door.
 |
IMPORTANT: Make sure you can keep visual contact with the patient during the X-ray. |
- Make sure that the
 icon is displayed on the RVG Connect unit.
Alternatively, make sure that the ![]() icon is displayed in CS Imaging Software toolbar indicating that the RVG sensor is connected to the workstation and is ready for acquisition.
icon is displayed in CS Imaging Software toolbar indicating that the RVG sensor is connected to the workstation and is ready for acquisition.
- Trigger the X-ray with the remote control of the X-ray source.
The screen on the RVG Connect unit indicates the transfer of the image to the workstation.
![]()
The image is then displayed in the Imaging Window.
- Check the image and if the quality is:
- Not satisfactory, for example, if the exposure quality indicator is red, retake the X-ray.
- Satisfactory, remove the X-ray source tube head.
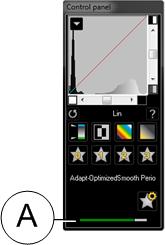 Ideal image quality is achieved when the Control Panel exposure indicator is a full green bar. This example shows the RVG 6200 Control Panel with exposure indicator (A). Avoid under-exposed or over-exposed images indicated by a partial or full red bar:
|
Under-exposed |
Ideal Image |
Over-exposed |
|---|---|---|
 |
 |
 |
- Remove the RVG sensor from the mouth of the patient.
- Remove the hygienic sensor protection and throw it away.
|
IMPORTANT: Do NOT pull the RVG sensor by its cable when you remove the hygienic protection. |
- Clean and disinfect the RVG sensor after each patient (see the RVG 142, RVG 5200 and RVG 6200 Safety, Regulatory, and Technical Specifications User Guide (SM847)).
- Use the CS Adapt Library software to manage the brightness/contrast filters.
In CS Imaging Software, you can use the CS Adapt Library software to manage the brightness/contrast filters as follows:
- Create custom filters by copying and editing existing factory preset filters.
- Use the Favorite function to select which filters are displayed in the Control Panel.
- Use the Acquisition Default function to automatically apply the selected filter at acquisition time.
- Import or export filter libraries.
Preparing Acquisition of Single Image Using RVG Connect
Single Image X-ray Exposure Times