Creating Schedule Standards
If you intend to use a Block Booking template—known in OrthoTrac as a Standard—then you must first create the appointment types. After creating the appointment types, you can set up multiple layouts of those appointment types for specific times of the day. After creating the layouts, you can add them to specific days you intend to be open and treating patients.
To create a standard:
-
Click the Maintenance icon
 . The OrthoTrac Maintenance window is displayed.
 -
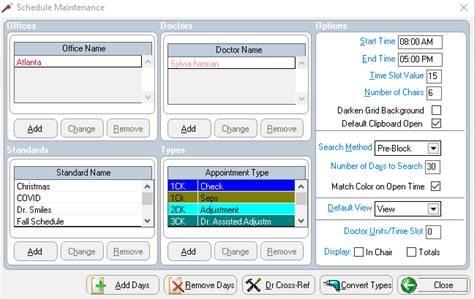
Click Schedule Maintenance. The Schedule Maintenance window is displayed.

In the upper-left is the office name, in the center is the doctor’s name, to the right are the specific office hours. In the lower-left are the Scheduler standards, and in the middle are the appointment types.
-
In the Standard Name section, click Add. The Create Standard window is displayed.
-
Enter information in the following fields and then click Apply:
OR
To copy an existing standard, select Copy Existing. Select a standard from the list and copy it. Change the settings, as needed, and then click Apply.
-
In the Types section, click Add. The Add Appointment Type window is displayed.
-
Do the following:
-
Assign each appointment type a two- to four-character code and a description. For example, check = CK, 4-unit banding = BD4, and so on.
-
Indicate the following for each appointment type:
-
Number of units
-
Chairs used
-
Color to be displayed on the schedule: dark green, light green, dark cyan, light cyan, dark red, red, purple, magenta, gold, yellow, or blue
-
Days of the week this type of procedure is performed
Note: Appointment types can be generic: 15-minute appointment, 30-minute appointment; or specific: records, consultation. Most offices use a combination of both appointment types.
-
Click OK.