Working with
Contracts
Setting Up Contracts
To set up a contract:
In a patient chart, click the Financial Functions  button. The Financial
Functions—Charges and Payments window is displayed.
Click the Contracts
and Payment Plans  button.
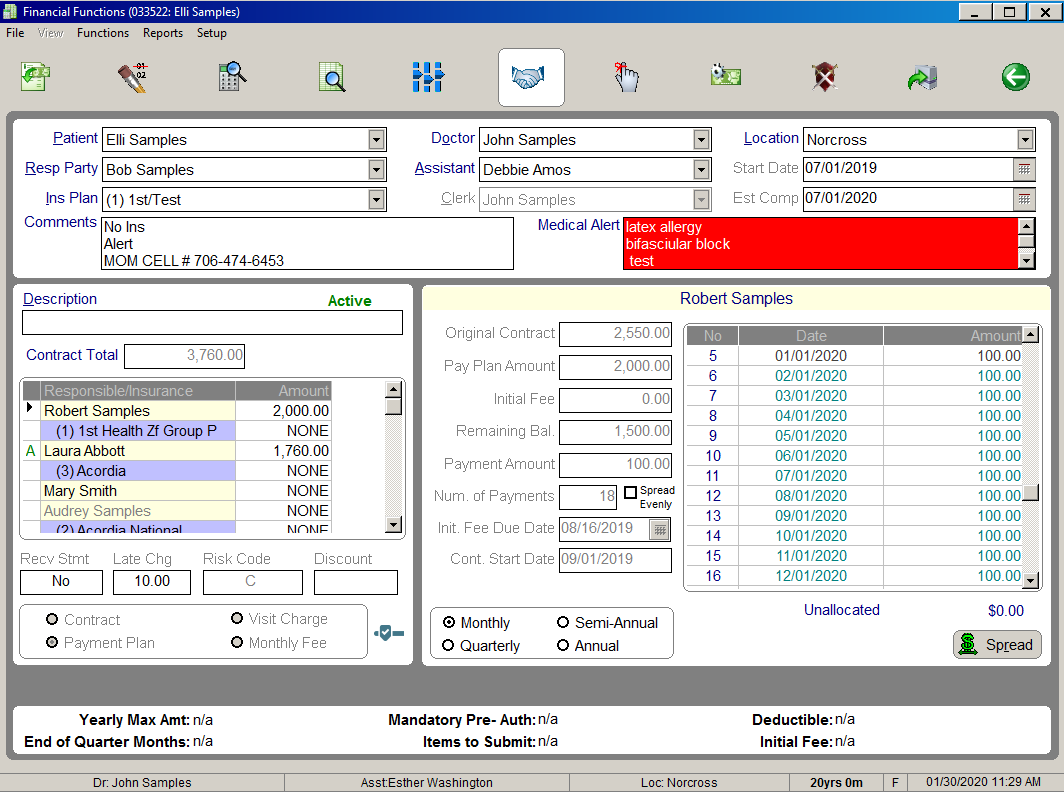
The Financial Functions—Contracts
and Payment Plans window is displayed.

In the Description
field, select a contract description from the drop-down menu or add
a new description. Press Tab.
In the Contract
Total field, type the full contract amount before discounts,
which includes the responsible party portion and insurance carrier
portion, if applicable. Press Tab. The total contract amount
is displayed next to the first responsible party listed in the Responsible/Insurance section.
If the first responsible party
is paying the entire contract amount, press Tab again.
In the Initial
Fee field, type the amount of the contract that is due on the
initial fee due date. Press Tab.
In the Payment
Amount field, type the payment amount to be paid monthly, quarterly,
semi-annually, or annually. Press Tab. The software calculates
the payment amount if you leave this field blank and enter the total
number of payments in the Num. of
Payments field.
In the Num.
of Payments field, type the number of payments. Press Tab.
In the Init.
Fee Due Date field, type the date the initial fee is due. Press
Tab.
The initial fee due date determines when a contract becomes
active. If you use the current date, the contract is activated, and the
initial fee amount is applied to the current balance when you post the
contract. If you use a date in the future, the status of the contract
is Pending.
In the Start
Date field, type the date that the first contract charge should
be applied. In a single-due-date system, the date defaults to the
roll date for the next month. In a multi-due-date system, the date
defaults to one month from the initial fee due date.
To use the default payment term of Allow
only 1 Charge per Month, press Tab. The Spread
button is selected. Press Tab. The Post
Transactions button is selected.
OR
To use a different payment term for the contract, select
a new payment term. Press Tab. The cursor immediately moves to the Post Transactions button.
Type a description.
Press Enter or click the Post
Transactions  button. If you
have not entered a banding date, the Contract
message is displayed.
To enter a banding date, click the
calendar next to the Start Date
field and select a date, or type the date in the field.
To enter an estimated completion
date, click the calendar next to the Est
Comp field and select a date, or type the date in the field.
Related Topics
Setting
Up Contracts with Insurance or Multiple Responsible Parties
Using the Financial
Estimator Setup Window
Skill Sharpeners
 button. The Financial
Functions—Charges and Payments window is displayed.
 button.
The Financial Functions—Contracts
and Payment Plans window is displayed.
 button. If you
have not entered a banding date, the