General Imaging Functions > Importing and Exporting Images > Exporting Images
Exporting Images to a Folder or an Email
Prerequisite:
-
If you are in the Patient Browser standalone mode, select a patient in the Patient List. All image thumbnails for the selected patient are displayed in the Patient History.
-
From your DPMS, launch CS Imaging.
The current patient's name is displayed in the title bar in CS Imaging.
To export images, follow these steps:
-
Press Ctrl + click to select the images that you want to export.
-
Do one of the following in the Patient Browser or Dashboard in the Export icon group: To send the images in an email, select
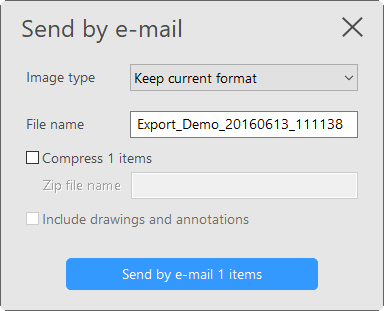
 . The Email Export window is displayed.
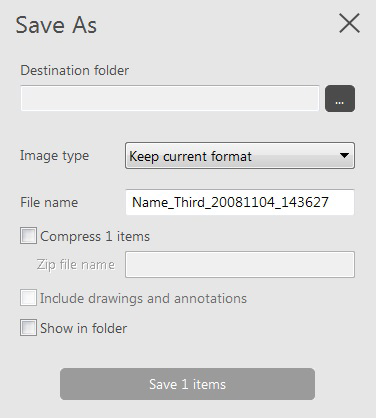
To save the image in a folder, select ![]() . In the Save As window, for the Destination Folder, click
. In the Save As window, for the Destination Folder, click ![]() to browse to a folder.
to browse to a folder.
-
In the Image Viewing Workspace or Darkroom mode, in the
 Share toolbar:
 -
To send the image in an email, click
. The email export window is displayed.
-
To save the image in a folder, select
 . In the Save As window, for the Destination Folder, click
  to browse to a folder.
-
Select from the following drop-down lists based on the format type below: Image type
|
Keep current format
|
CS Imaging file format with all processing information preserved.
|
|
For Presentation |
A read-only format that can be used in other DICOM-compliant applications. |
|
BMP, JPEG, TIFF, PNG |
Standard graphics formats.
|
-
Model type
|
Keep current format
|
A folder with a DICOM file and analysis, if any.
|
|
STL, PLY |
Standard 3D formats.
|
4. If you are in the Save As or Send by e-mail window, you can also select one or more of the following options.
|
Compress items |
In the folder you select, a zip file is created that contains all the exported image files. You need to specify a name for the zip file. |
|
Include drawings and annotations |
Select to save the image with any drawings, measurements, or other overlaid elements visible. If the image is saved as “Keep current format,” BMP, JPEG, TIFF, or PNG formats, annotations are also saved. This does not apply to Model types. |
|
Show in folder |
(This option is not available when sending by email.) Select to open a Windows Explorer window that shows the contents of the folder in which your exported images were saved. |
-
Do one of the following:
-
If you are sending an image in an email, click Send by e-mail items. A new email is created in your default email application with the exported image or images attached to the email.
-
If you are saving to a folder, click Save items.
|
|
Note: This button is grayed out until you specify an export folder. |
