Touchscreen Control Panel
The control panel is an alphanumeric, digital soft-touch console. It allows you to interact directly with the unit to carry out panoramic and 3D functions. Most of its interface is similar to the workstation interface that displays operating parameters and error messages.
Figure 3 - CS 9600 2D Touchscreen Control Panel
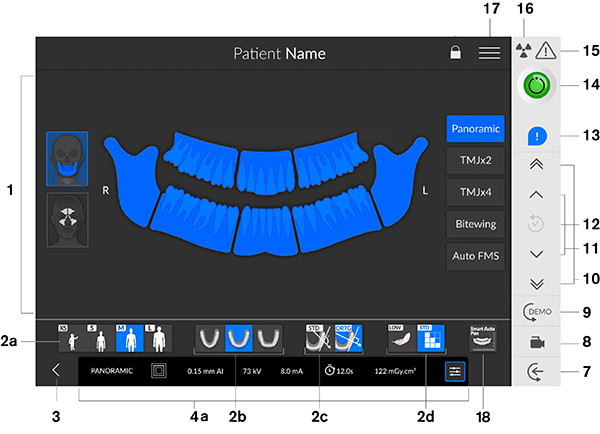
Figure 4 - CS 9600 3D Touchscreen Control Panel

| IMPORTANT: 'R' indicates that it corresponds to the right side of the patient who is facing the operator. |
|
1 |
Program pane and Preview screen - Displays the choice of programs and enables you to choose different radiological exams according to the unit edition that you have. |
||
|
2a |
Selected parameter display - Displays the current acquisition parameter settings. Patient type - Child, Adult (small, medium, large). |
||
|
2b |
Dental arch morphology - Normal, square, or sharp shaped. |
||
|
2c |
Type of trajectory - Standard or orthogonal options. |
||
|
2d |
Imaging mode - Imaging mode that you can select before doing an exam (standard or low dose for 2D), (standard, low dose, or High Resolution for 3D). |
||
|
|
|
||
|
3 |
Exits the acquisition interface. |
||
|
4a |
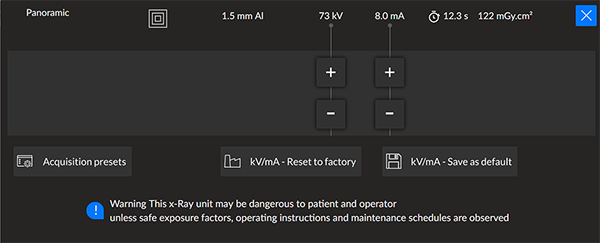
2D Exposure parameter panel - Enables you to choose and save exposure parameters for the radiological image acquisition.
|
||
|
4b |
3D Exposure parameter panel - Enables you to choose and save exposure parameters for the radiological image acquisition.
Acquisition presets - Enables you to select and set imaging modes and FoVs as default settings.
|
||
|
5 |
Scout view 2D - Displays the sagittal slice view of the acquired image. SmartAuto 3D (optional) - To select it, you must first acquire a Scout view 2D image. Then click |
||
|
6 |
CS Metal Artifact Reduction (CS MAR) Filter (optional) - Filter to avoid image distortions caused by metal from objects such as prosthesis, screws or dental fillings. |
||
|
|
|
||
|
6a |
Advanced Noise Reduction (ANR) Filter - Advanced algorithm that reduces noise in the image and preserves image details. If a patient has previously been examined, the unit will detect it and the icon will appear in orange. |
||
|
7 |
Patient entry -Positions the unit in the patient entry mode. |
||
|
8 |
Live positioning camera - Enables the camera for live positioning assistance. |
||
|
9 |
Demo - Enables you to demonstrate the acquisition procedures to a patient without the X-ray. |
||
|
10 |
Fast Height Adjustment button - For fast adjustment of the height of the unit to the height of the patient. |
||
|
11 |
Slow Height Adjustment button - For slow adjustment of the height of the unit to the height of the patient especially for the final adjustment. |
||
|
12 |
Patient data history - If a patient has previously been examined, the unit will detect it and this icon will turn orange. |
||
|
13 |
Accessory notification - Will appear on the interface if you do not use a positioning accessory that corresponds to an acquisition. |
||
|
14 |
Ready indicator:
|
||
|
15 |
Warning - Indicates that you must consult the accompanying document. |
||
|
16 |
Ionizing radiation:
|
||
|
17 |
Menu - Provides access to the following sub-menus: General Settings, DICOM Settings, 2D-3D kV/mA Reset to factory, Quality Check History, Shutdown / Restart, About. |
||
|
18 |
SmartAuto Pan (optional):
|


 to display the sagittal and axial slice view of the image.