3D Acquisition Interface Overview
The 3D Acquisition interface provides you with 3D imaging acquisition functions.
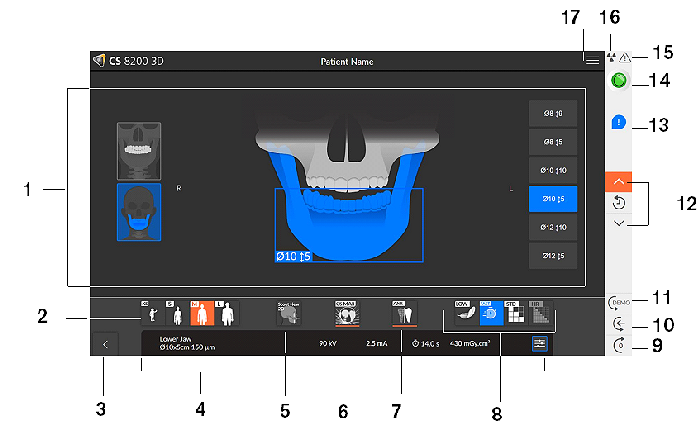
Figure 7 3D Acquisition Interface (depending on unit configuration)
|
1 |
Program pane and Preview screen: Displays the choice of programs and enables you to choose different radiological exams according to the unit edition that you have. |
||
|
2 |
Patient type: Child, Adult (small, medium, large). If a patient has previously been examined, the unit will detect it, and either one of the icons will display in orange.
|
||
|
3 |
Exits the acquisition interface |
||
|
4 |
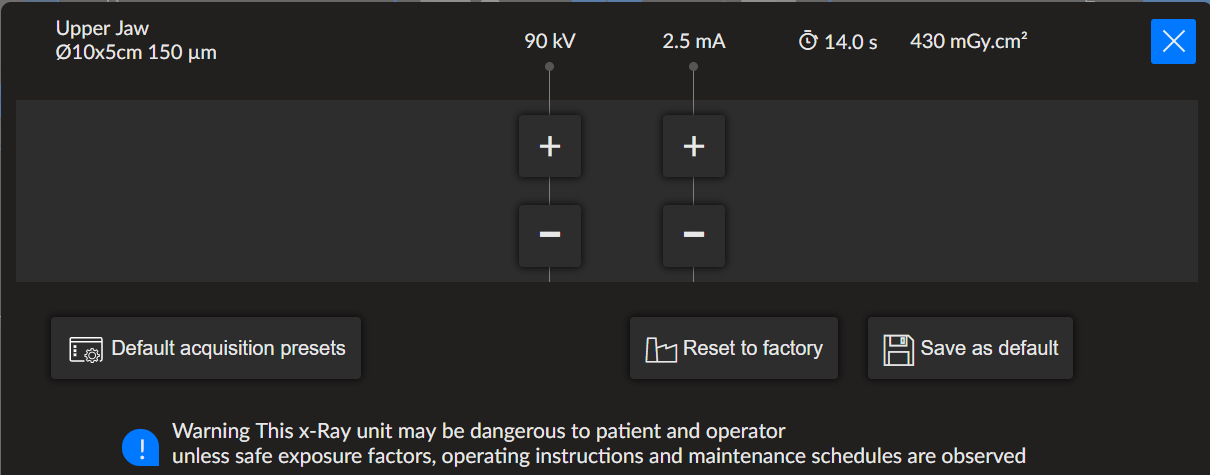
Exposure parameter panel: Enables you to choose and save exposure parameters for the radiological image acquisition.
Default acquisition presets (not available for CS 8200 3D Access): Enables you to select and set imaging modes and FoVs as default settings.
|
||
|
5 |
Scout view 2D (not available for CS 8200 3D Access):
|
||
|
6 |
CS Metal Artifact Reduction (CS MAR) Filter (optional): Filter to avoid image distortions caused by metal from objects such as prostheses, screws, or dental fillings. If a patient has previously been examined, the unit will detect it, and the icon will display in orange.
|
||
|
7 |
Advanced Noise Reduction (ANR) Filter: Advanced algorithm that reduces noise in the image and preserves image details. If a patient has previously been examined, the unit will detect it, and the icon will display in orange. |
||
|
8 |
Imaging mode: Imaging mode that you can select before doing an exam (low dose, fast, standard, or High Resolution for 3D). For CS 8200 3D Access: Low dose, standard, or High Resolution (limited to focused FoVs). |
||
|
9 |
Parallel position button: Leaves more free space around the unit when it is not in use by placing the rotative arm in a parallel position to the unit head. |
||
|
10 |
Reset button: Resets the unit to the patient-entry position to enable you to position a patient in the unit. |
||
|
11 |
Demo: Enables you to demonstrate the acquisition procedures to a patient without the X-ray. |
||
|
12 |
Patient height data (not available for CS 8200 3D Access): If a patient has previously been examined, the unit will detect it, and two of these icons will display in orange. They will disappear when you use the positioning panel on the unit to adjust the height of the unit (up or down) to the previously recorded height of the patient. |
||
|
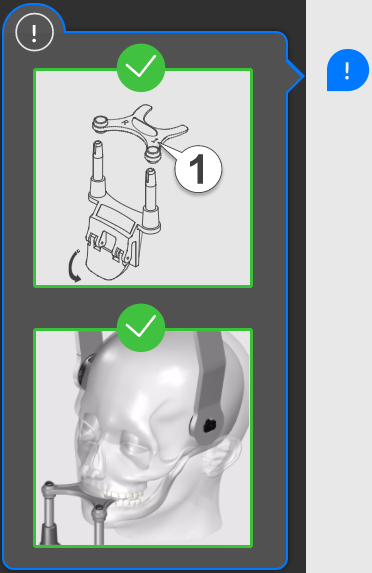
13 |
Pop-up of accessory and patient head position: Will display on the interface when you click to choose a radiological exam, to indicate which positioning accessory to use and how to position the patient's head.
|
||
|
14 |
Ready indicator:
|
||
|
15 |
Warning: Indicates that you must consult the accompanying document. |
||
|
16 |
Ionizing radiation:
|
||
|
17 |
Menu: Provides access to the following sub-menus: General Settings, 2D 3D kV/mA Reset to factory, About, Help. You can select the settings that you want as default settings for the acquisition interface. See Displaying User Preferences. |