Using the Prosthetic-Driven Implant Planning Workflow with Implants
Using the Implant Object List to Edit Implants and Display Information
To display information about an implant that has already been placed, follow these steps:
-
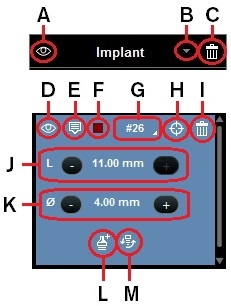
In the object list in the Tools pane, click the drop-down list (B) and select Implant.
The object list displays a list of existing implants.

-
Do any of the following:
|
To show or hide implant objects in an image... |
In the object list:
|
|
To delete implant objects in an image... |
Note: Make sure you want to proceed before you click - there is no confirmation message and no undo feature. |
|
To have the information for an implant object displayed in the image... |
Click To hide the implant information displayed in an image, click |
|
To change the color of the implant object in the 2D MPR view screens... |
Click the color box (F) in the implant object toolbar, and select a different color for the object. |
|
To view the information for an implant... |
In the object list, next to the implant name (and the number for the tooth on which the implant is placed) |
|
To have the view screens positioned with the implant in the center... |
Click the The view screens are repositioned so that they center on the selected implant. |
|
To modify the length of the implant... |
Use the plus and minus buttons (J). |
|
To modify the diameter of the shoulder platform of the implant... |
Use the plus and minus buttons (K). |
|
To add an abutment to the implant... |
|
|
To replace the implant... |
An implant selection window appears.
|
