Using the Reformatting Tool
The Reformatting Tool opens automatically when you open a 3D volume acquired from a specified device type and allows you to derive a new volume from the existing 3D volume.
In the Reformatting Tool dialog box, you can do the following to derive this new volume:
-
Adjust the angulation of the 2D MPR planes to set the patient position.
-
Change the voxel size to create a lighter volume (and lower resolution), which is useful for example for compatibility with other software applications.
-
Use the Cropping box to focus on a specific region of interest.
|
|
Important: When you use the Reformatting Tool, a duplicate volume is created in the same patient folder. Make sure you have sufficient disk space available before using this tool. |
To use the Reformatting Tool, follow these steps:
-
From an imaging software application, open the 3D volume you want to reformat.
The Reformatting Tool window appears.
-
On the Axial Slice View Screen, Coronal Slice View Screen, and Sagittal Slice View Screen, you can do the following:
-
To select a slice thickness, click
 in the top right corner of a view screen and select a thickness.
 -
To select a thickness mode, click
 and select a mode.
 -
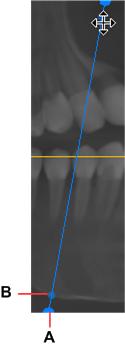
Use the end handles (A) to move the slice planes, and the tilt handles (B) to adjust angles.

6. To crop a 3D volume and display only part of the volume, select the Cropping box option, and adjust the white handles (A) around the three 2D MPR slices.

7. To change the voxel size, select a higher voxel size from the Voxel Size drop-down list.
8. Enter a name in the Volume Name field and click OK.
You must enter a name to be able to save the reformatted volume.
|
|
Note:
|

