Acquiring 2D Images > Acquiring Full, Segmented, Orthogonal Panoramic, and Lateral TMJ Images
Preparing and Positioning Patients for Full, Segmented, Orthogonal Panoramic, and Lateral TMJ Images
To prepare and position adult and pediatric patients, follow these steps:
-
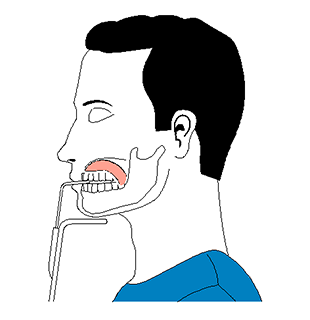
Position the appropriate chin rest on the chin rest support (make sure that it clicks fully into place) and cover the bite block with a hygienic barrier. If needed, use the edentulous bite block.
 will appear on the interface if you do not use the corresponding positioning accessory. Click on it.
- The appropriate accessory will appear in green. The inappropriate accessory will appear in red.
Note: To acquire a bitewing segmented panoramic image:To acquire a bitewing segmented panoramic image:
-
Click
 .
. -
Select one or both areas of interest.

-
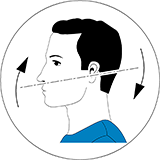
Position the patient in the Camper plane alignment (horizontal occlusion) as shown.
For a more accurate Camper plane alignment, you can:
- Use the panoramic chin rest.
- Fit the standard bite block or edentulous bite block to the panoramic chin rest.
 |
IMPORTANT: Do not use the Frankfort guide bite block when performing bitewing procedures. |
-
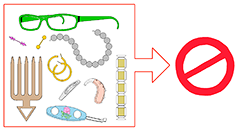
Ask the patient to remove and place all metal objects in the jewelry tray.
-
Ask the patient to wear a lead apron. Ensure that the apron lays flat across the patient’s shoulders.
-
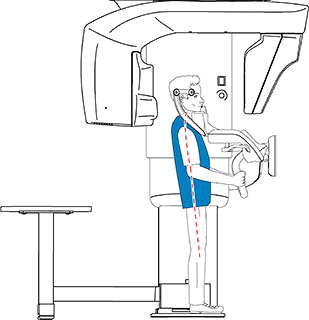
Ask the patient to enter the unit. On the Touchscreen Control Panel, press and hold
 to adjust the unit to the height of the patient.
 |
Note: If the patient is too tall, ask the patient to sit on a stool. |
-
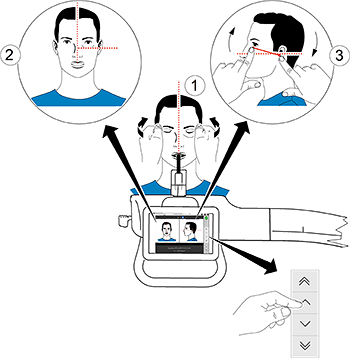
Ask the patient to do the following:
|
|
-
On the Touchscreen Control Panel, click
 to turn ON the Live Positioning Assistance.
 -
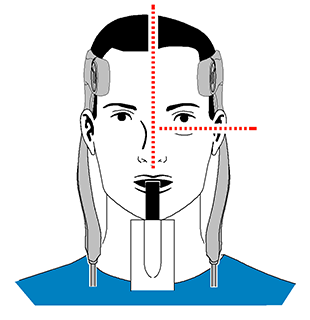
Position the patient with your hands
 using the:
-
Mid-sagittal positioning line
 for a vertical alignment.
 -
Frankfort plane positioning line
 for a horizontal alignment: You can position the patient either manually or by using the Artificial Intelligence (AI) button:
 -
Frankfort plane manual positioningFrankfort plane manual positioning
-
Mark two horizontal points representing the horizontal positioning line
of the patient's
head on the screen. -
Mobilize the patient's head to the horizontal positioning line with your hands.
 or
or  will blink if the patient's head is not in the horizontal positioning
line.
will blink if the patient's head is not in the horizontal positioning
line.-
Click
or until
it stops blinking.
-
-
Frankfort plane AI positioningFrankfort plane AI positioning
-
Click
 .
.
The unit automatically detects the Frankfort alignment function.
-
Click
or until
it stops blinking.
The unit stops moving when the patient's head is in the Frankfort plane alignment.
-
|
Note: You can change the automatic AI positioning line by marking two horizontal points on the screen and manually positioning the patient. |
-
Immobilize the patient's head with the temple supports. Tighten the temple supports using the temple support adjustors.
-
On the Touchscreen Control Panel or workstation screen, click
 to activate the optional SmartAuto Pan function, then launch an X-ray with the remote control. The SmartAuto Pan screen will display the image:

-
Click OK.
-
To select different parameter settings from the default SmartAuto Pan parameter settings, make your selection on the parameter display panel.
-
Ask the patient to do the following:
- Close the eyes.
- Remain still.
- Breathe through the nose.
- Place the tongue in contact with the palate.
- Not swallow.
Acquiring Full, Segmented, Orthogonal Panoramic, and Lateral TMJ Images
Setting Acquisition Parameters for Full, Segmented, Orthogonal Panoramic, and Lateral TMJ Images