Acquiring 3D Sinus and Ear Images > Acquiring 3D Sinus Images
Launching the X-Ray for 3D Sinus Images
To launch the X-ray, follow these steps:
-
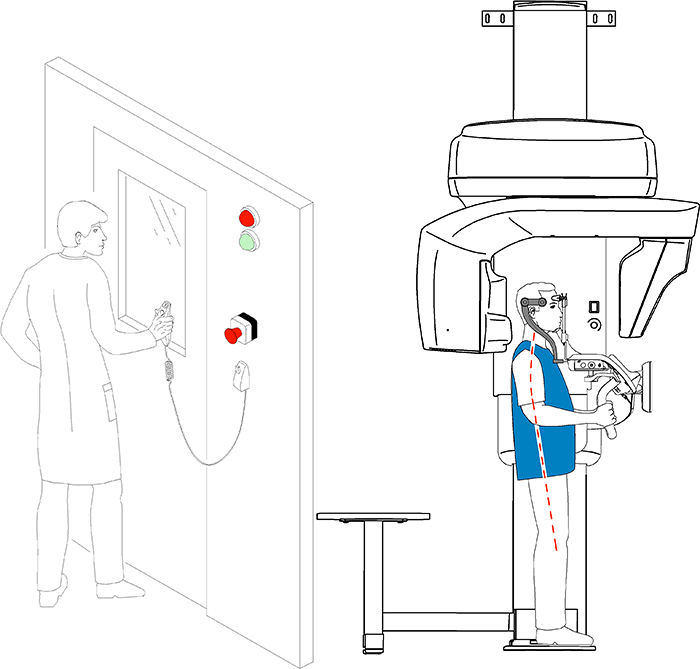
Leave the X-ray room and close the door. You must watch the patient by visual contact or on the screen during acquisition.
 |
IMPORTANT: If you need to stop the acquisition due to a problem, release the exposure button of the remote control or press the red emergency stop button. |
-
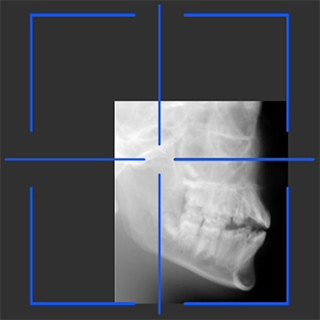
If you want to perform a scout view:
- Click
 , then launch an X-ray with the remote control. The Scout view 2D window will display the image:
 |
Note: You can adjust the length and width of the Scout view 2D. |
-
Once the scout view is done, the button becomes gray. You can perform another scout view by clicking the scout view button and re-doing the scout view action.
-
Click
 to change the contrast from black to white or white to black.
 -
To adjust for brightness or contrast, use
 .
. -
To set contrast change, brightness or contrast to default, click
 .
. -
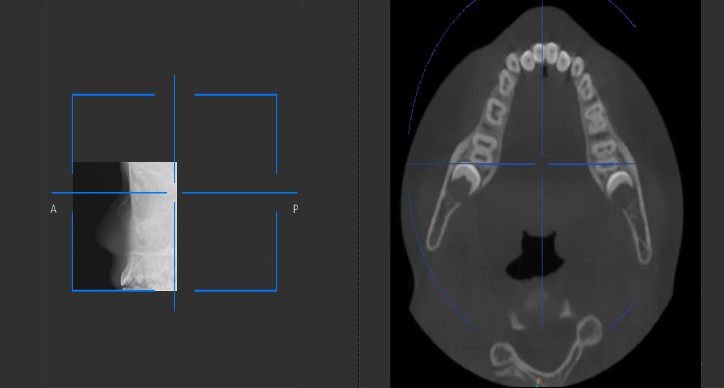
Click
 (optional), then launch an X-ray with the remote control. The SmartAuto 3D view window will display the images:
-
On the touchscreen control panel or on the workstation screen, drag the blue crosshair to move it to the area of interest that you require.
|
Note: The blue crosshair will turn orange if it reaches the boundary and cannot move any further. |
|
Note: You can perform another scout view by making a new FoV selection and launching the X-ray, or by clicking the scout view button (which turned gray) and re-doing the scout view action. |
-
Launch the X-ray with the remote control:
|
IMPORTANT: If you need to stop the acquisition due to a problem, release the exposure button of the remote control or press the red emergency stop button. |
- Press and hold the exposure button until the end of the acquisition is indicated by the on-screen “Release Switch” message.
- The
 turns yellow
  and a warning sound is heard, indicating X-ray emission.
 - The accessory position detector will change color during the X-ray emission.
|
Note: You will be able to see the patient in live-view mode on the workstation screen during the acquisition. |
When the acquisition ends, the acquired image appears on your screen.
-
Check the image quality:
- If you are satisfied, click Validate. The image is automatically transferred to the Imaging window.
- If you are not satisfied, click Discard and re-launch the X-ray with the remote control.
-
Do the following when the acquisition is finished:
- Open the temple supports and release the patient.
- Return the metal objects in the jewelry tray to the patient.
- Reset the unit rotative arm for the next acquisition.
X-Ray Dose Emission Information
Compliance with Directive 2013/59/Euratom
You can right-click on each image to display the estimated emitted dose received by the patient. You can use this information to calculate the effective dose received by the patient for the image.
The radiation emission dose is expressed in mGy.cm2. This dose is measured at the primary collimator outlet. The dose is accurate to +/-30%.
Acquiring 3D Sinus Images for Adult and Pediatric Patients